The Best Chocolate Chip Cookies Ever!

IMG_9667
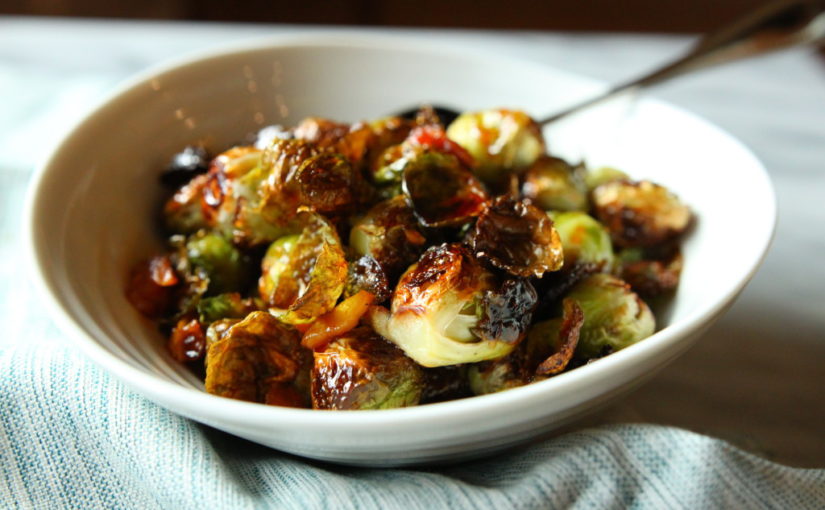
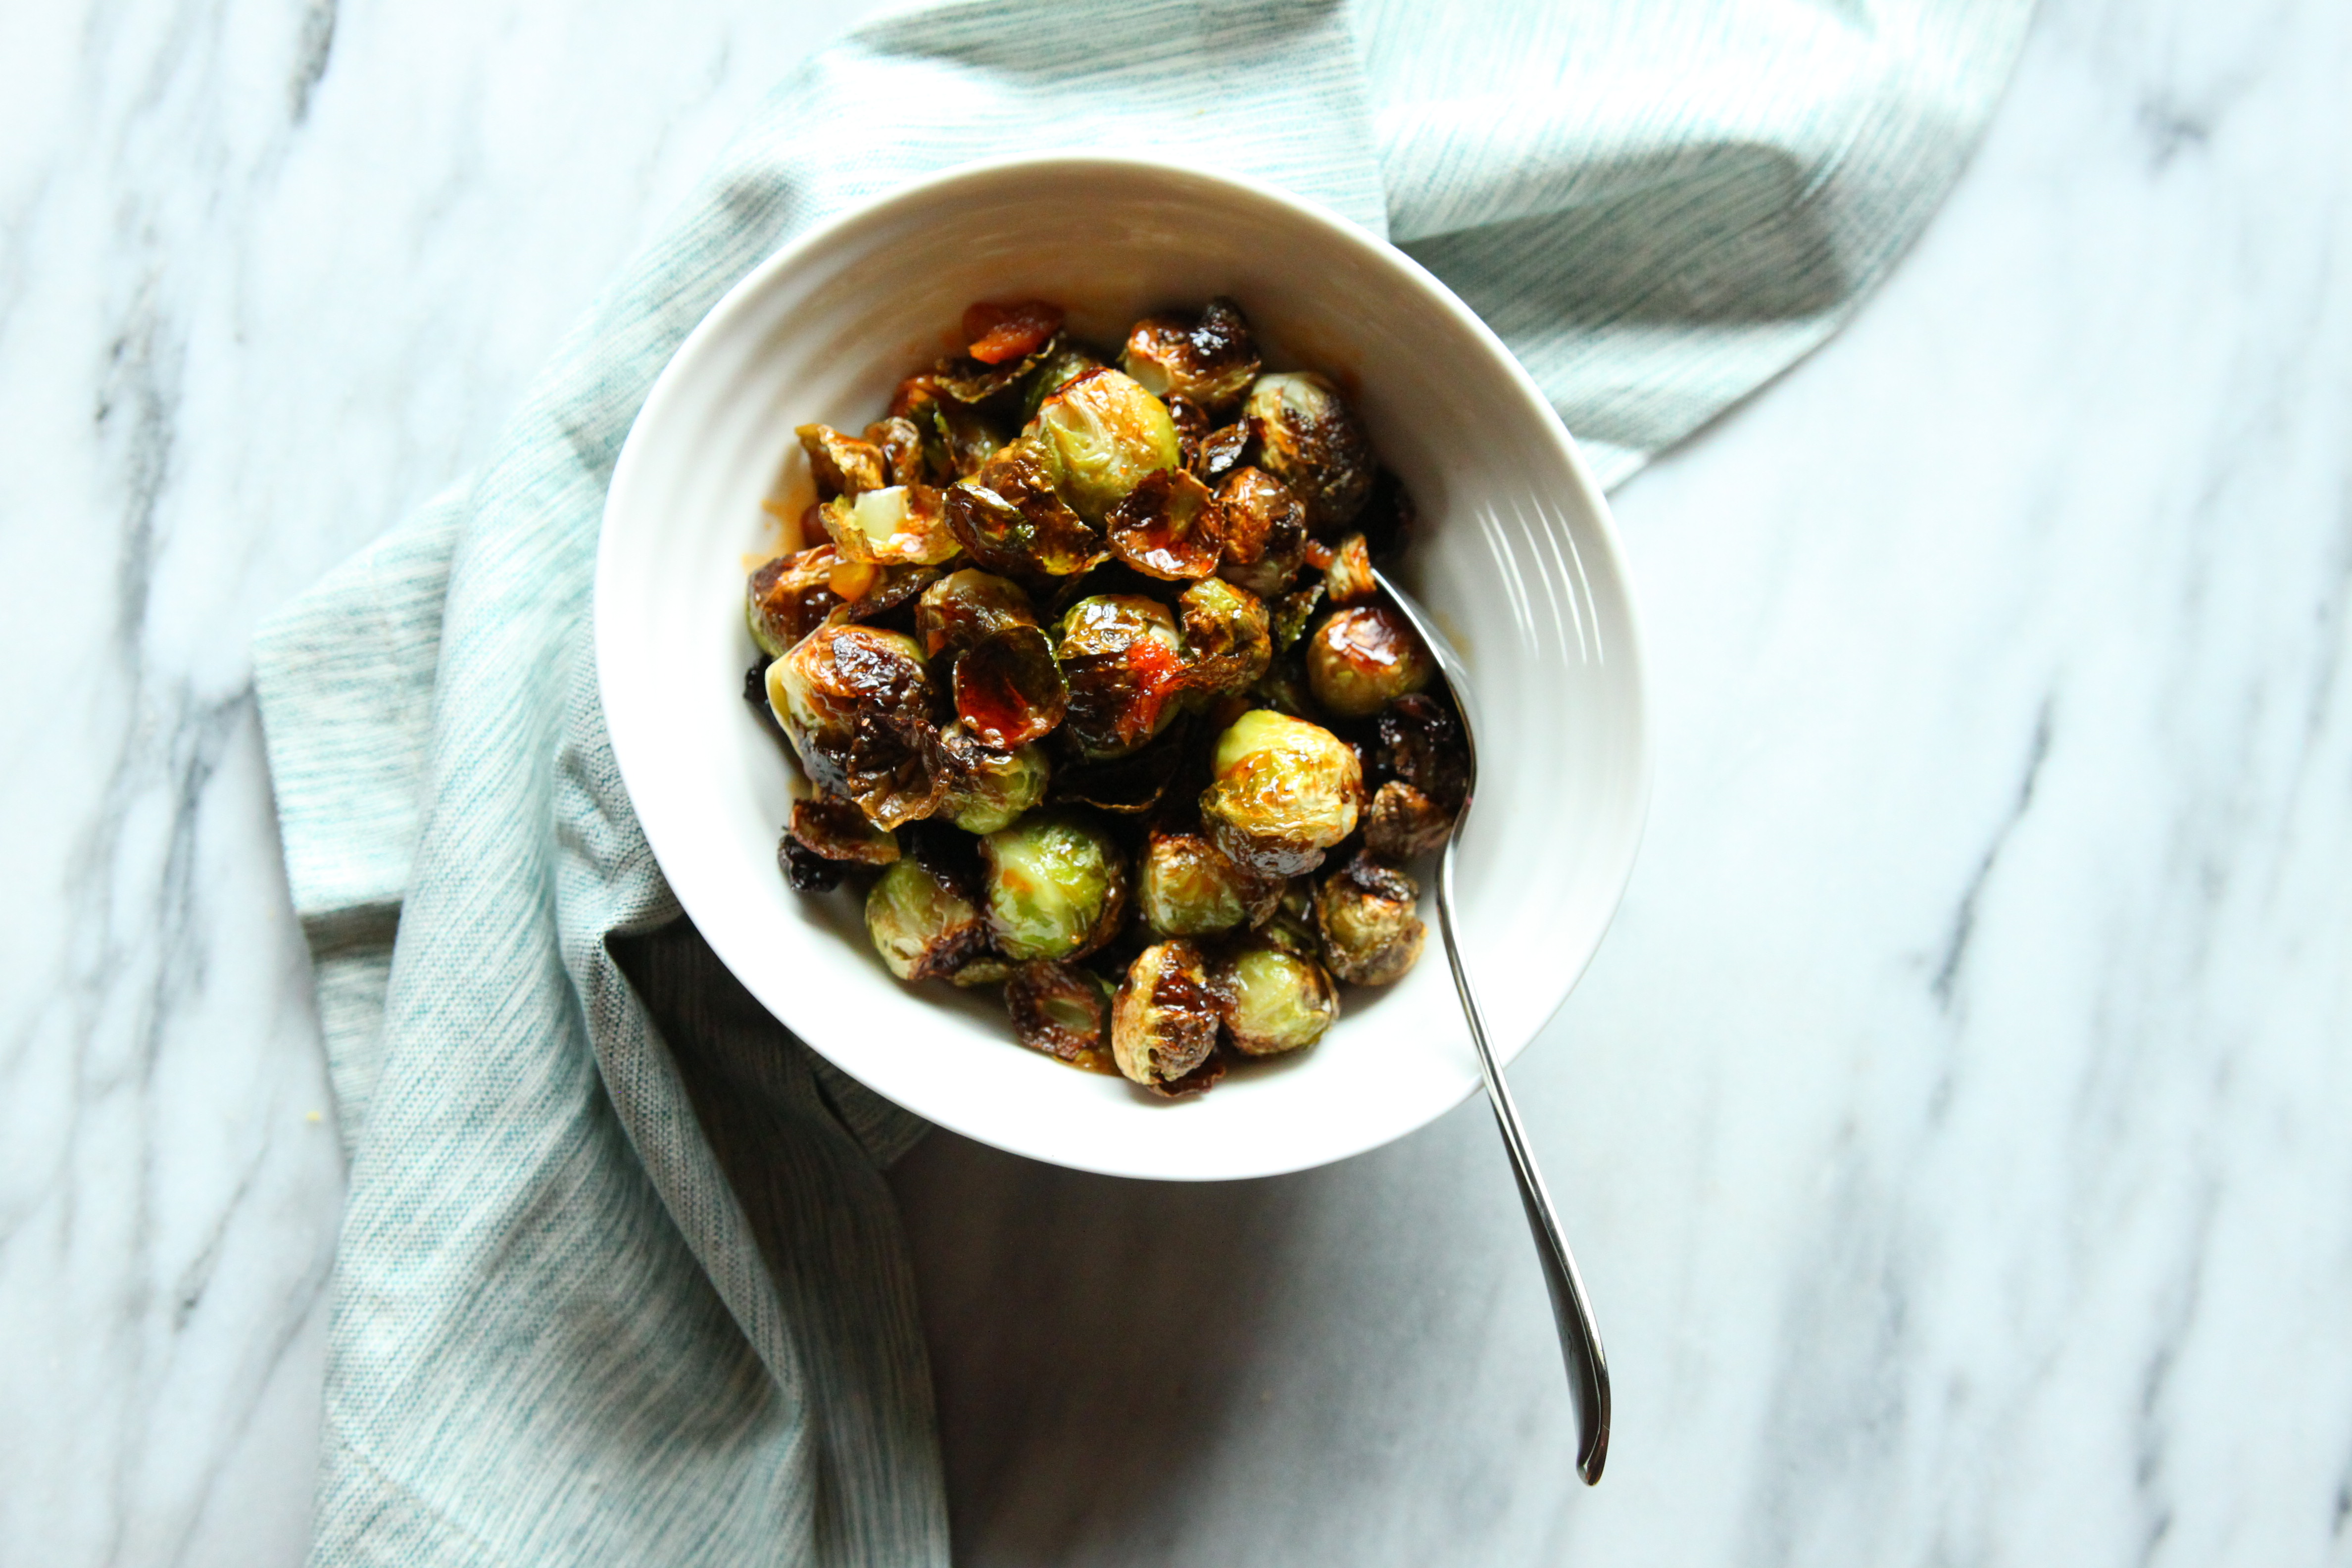
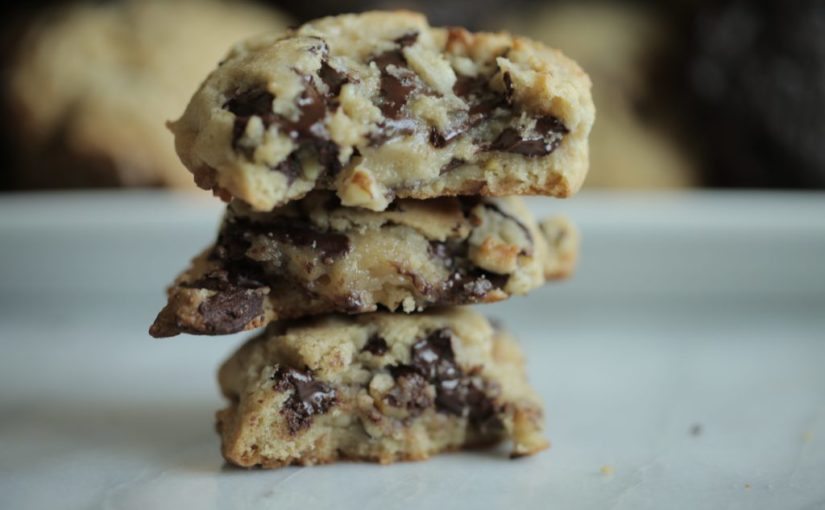
Have you ever had a cookie where you had an aha moment that you need this delicious butter laden pastry in your life multiple times a year? Well, that’s how I felt when I tried a famous Levain Bakery Cookie from NYC. In my past several visits to NYC, Levain has been on my list among many places to try. For some reason or another, we never were able to make it.

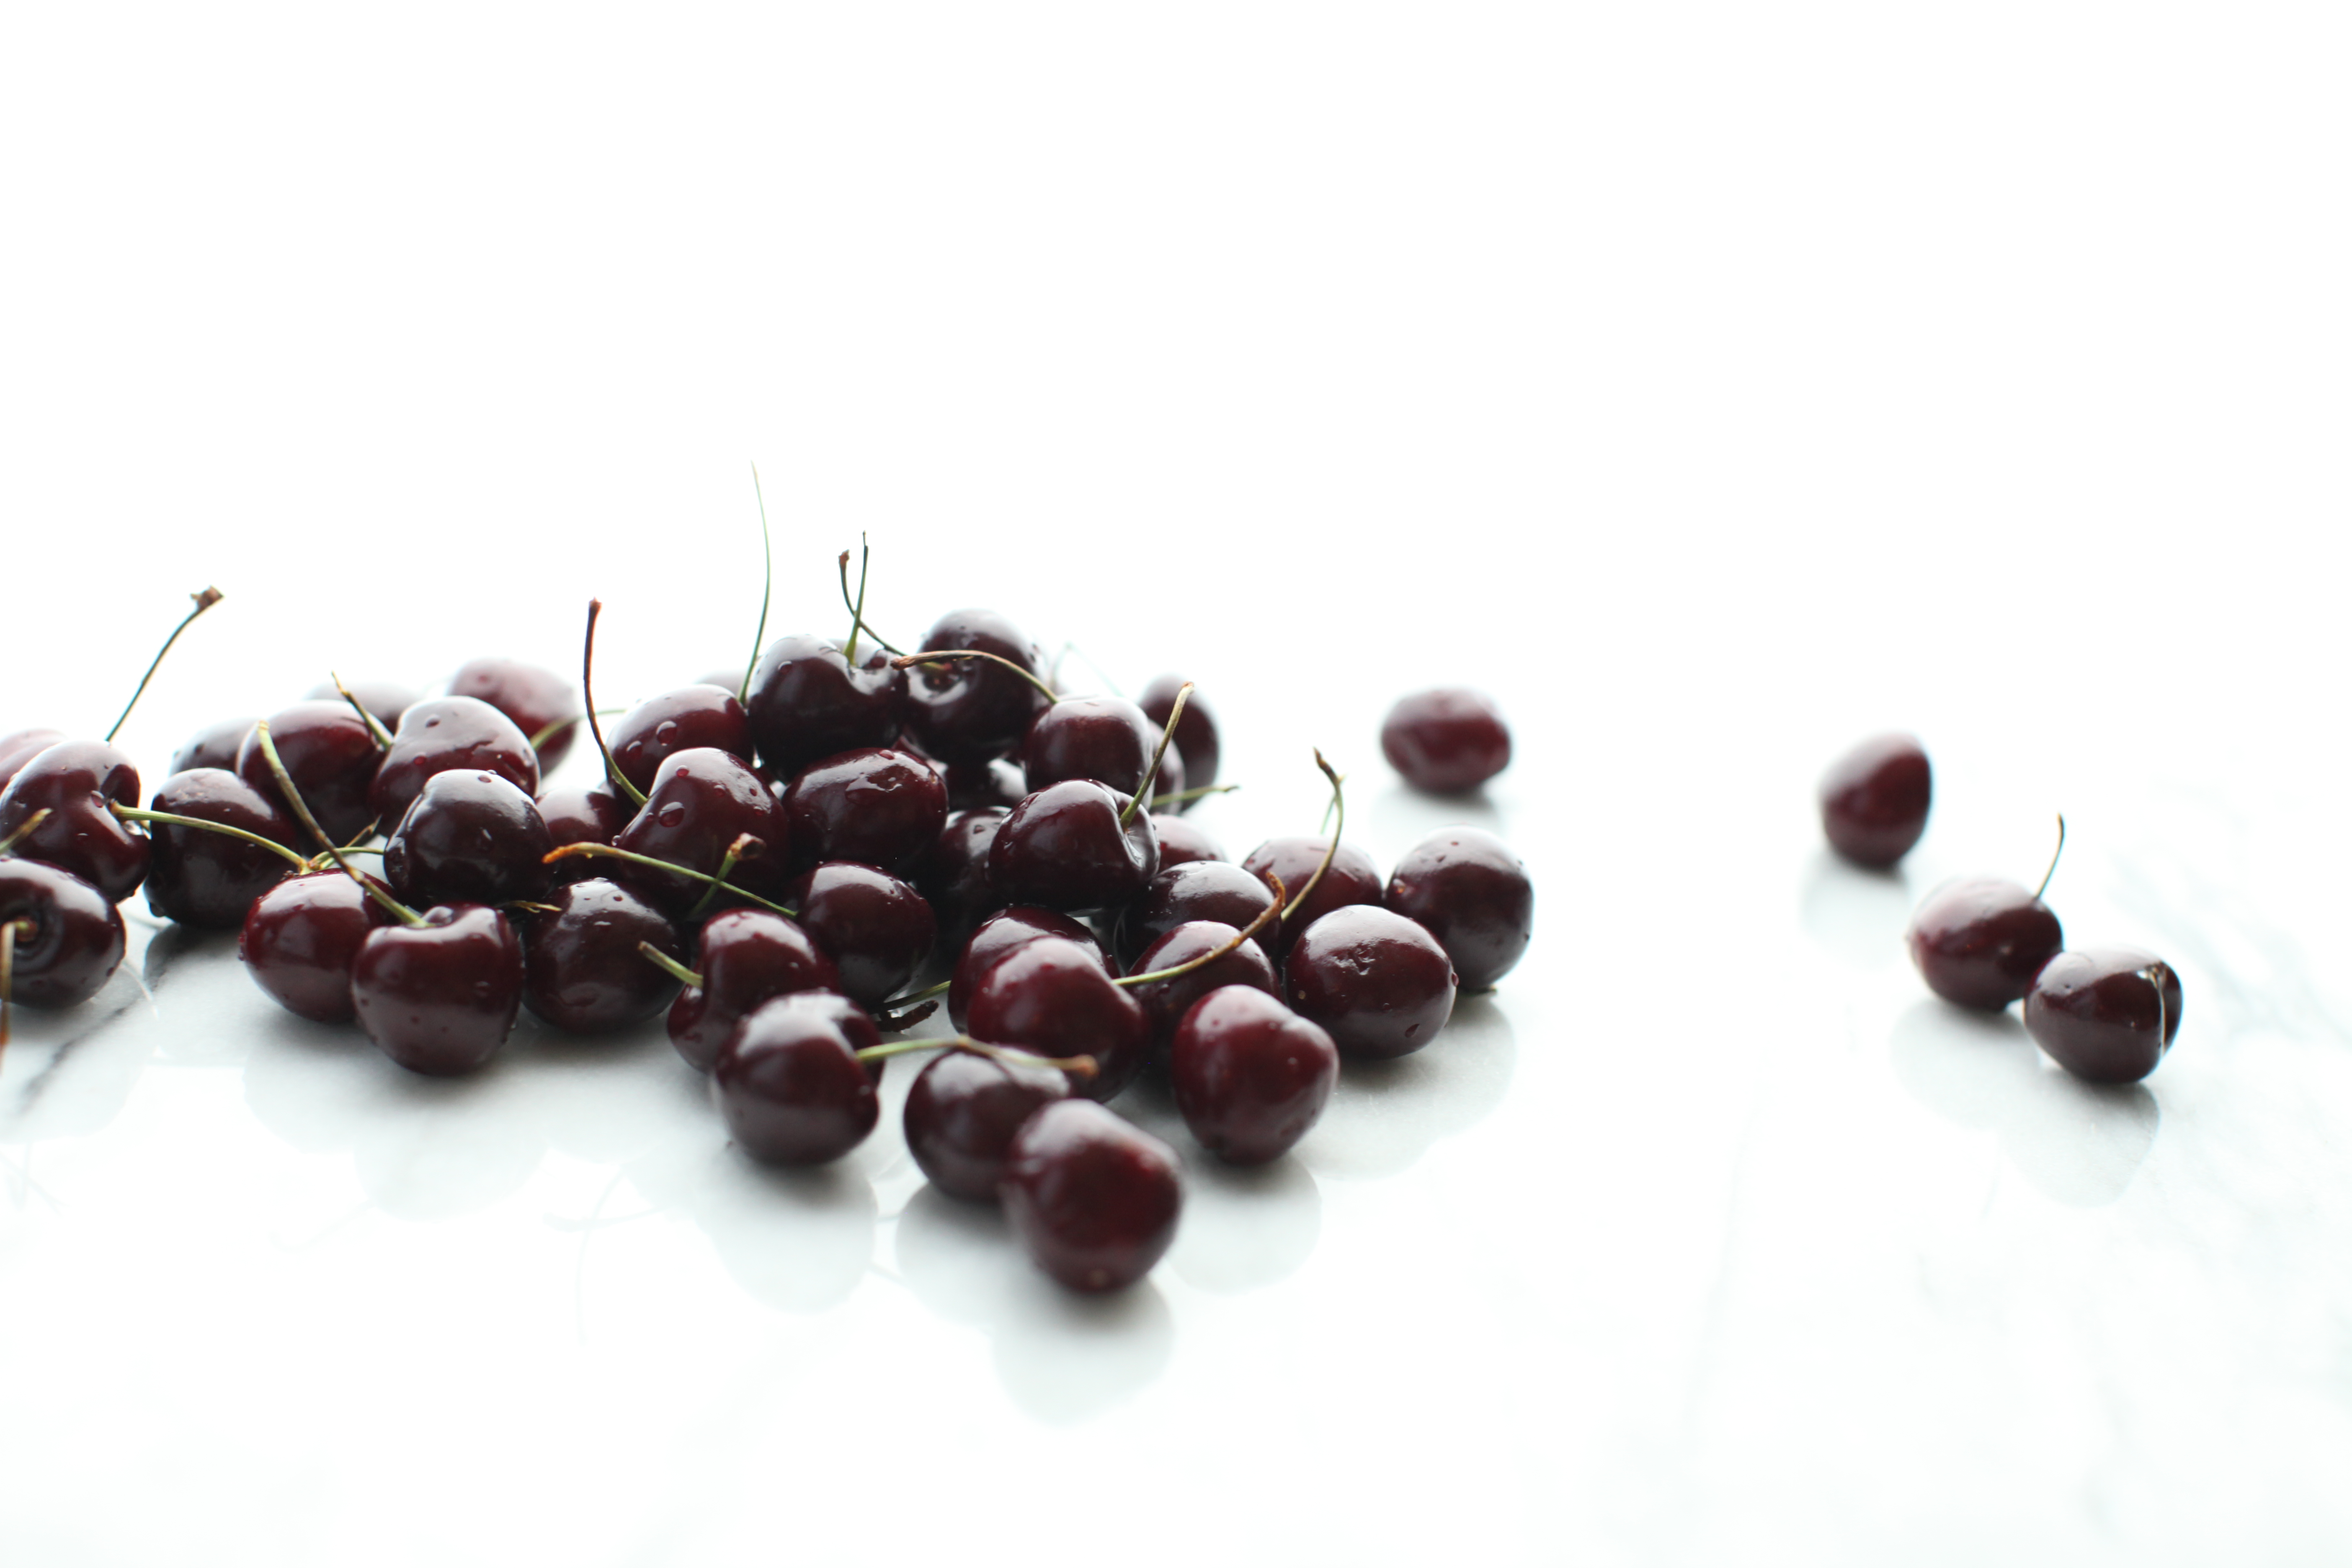
My in laws paid a visit recently to the bakery and were nice enough not to devour every cookie they purchased.  Upon my request, they brought back 2 cookies for my husband and me. After several days of being baked, they were STILL good! I couldn’t believe just how good they were so I decided to recipe test to get the closest version possible.

My awesome & talented blogger friend, Erika, aka The Pancake Princess, came over one day to help test recipes. After 4 hours, we found, then perfected the best copycat recipe. The key points are to make the dough balls pretty large, it doesn’t work well on tiny dough mounds; shock the dough at a high temperature cooking the outside while keeping the inside undercooked; using high quality ingredients ie: european style butter, and freezing the dough mounds before baking.

If you want to please your guests, these cookies are a must! I took them to a party that night and some people, no joke, got vicious! I noticed the plastic wrap pulled back around the plate with cookies missing before dinner was even served!

Levain copycat 1 levain copycat 2
Print Recipe
The Best Cookies Ever!
Course Dessert
Prep Time 20 minutes
Cook Time 9-1'
Passive Time 35 minutes
Servings
15
Ingredients
Course Dessert
Prep Time 20 minutes
Cook Time 9-1'
Passive Time 35 minutes
Servings
15
Ingredients
Instructions
  1. Preheat oven to 410 degrees.
  2. In large mixing bowl, cream together cold cubed butter, brown sugar, and sugar for 4 minutes or until creamy.
  3. Add eggs and vanilla, one at a time, mixing well after each one.
  4. Sift all dry ingredients together in a separate bowl: flours, cornstarch, baking soda, and salt. Mix until just combined to avoid over mixing. Stir in chocolate chips and walnuts.
  5. Scoop dough onto cookie sheet with a 2.66 oz scoop. Put in freezer for at least 30 minutes or until frozen.
  6. Bake for 9-11 minutes on the middle rack of your oven.
Recipe Notes

For best results, use 2.66oz scoop (volrath green scoop)

Fairy Marshmallows

TFCMarshmallows4
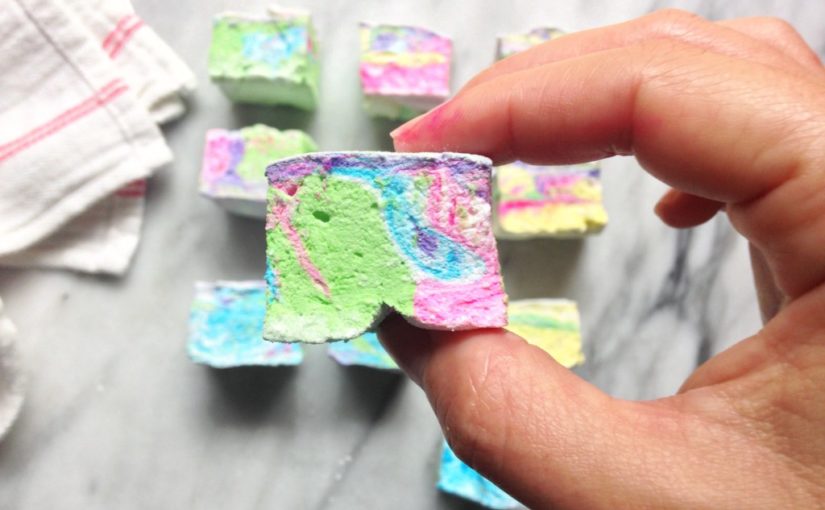
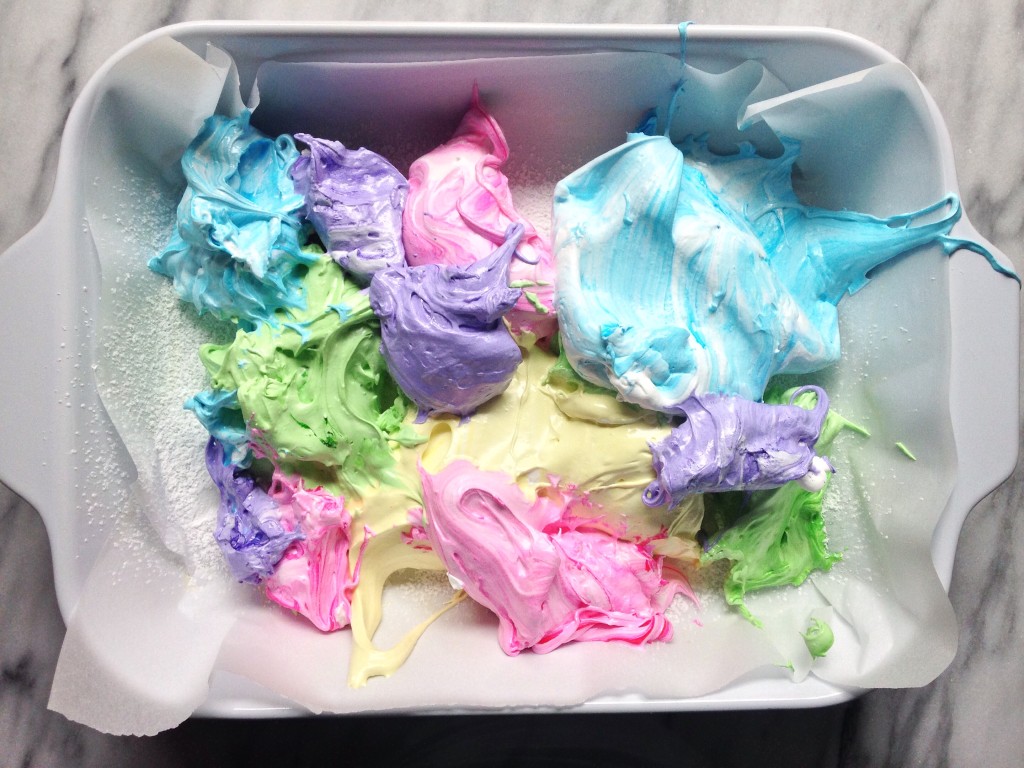
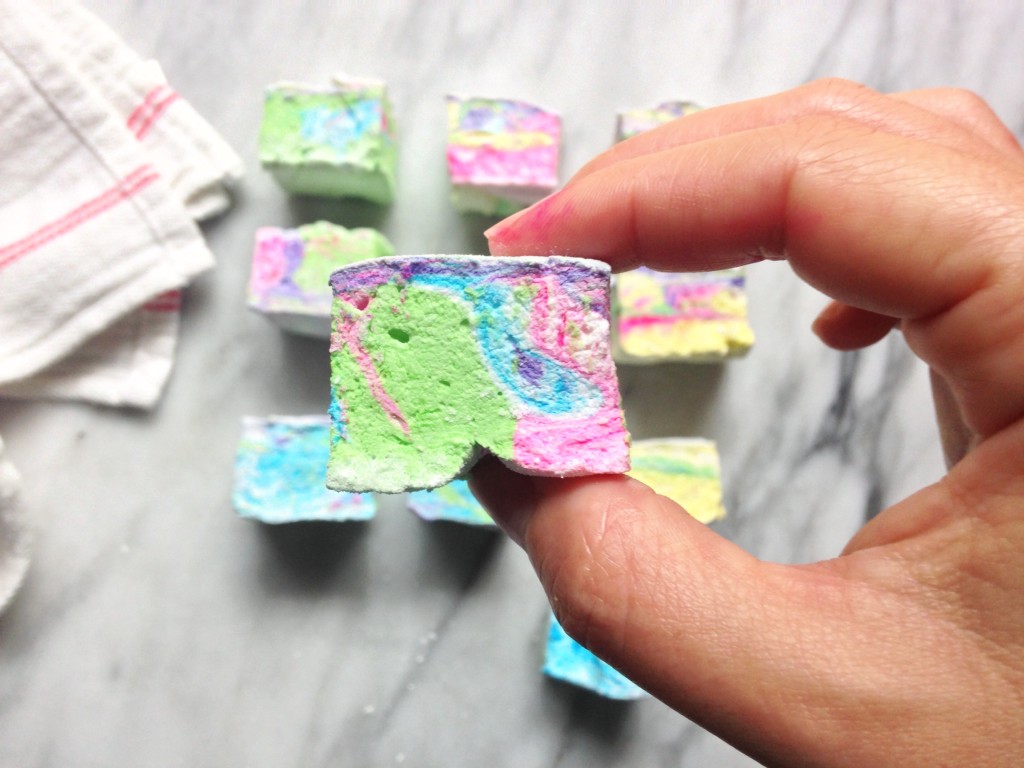
I have to be honest. I was scrolling through instagram (my usual thing) and was really inspired by a picture of rainbow marshmallows. I was busy so I put my phone down and forgot about them. Two days later, I couldn’t stop thinking about these marshmallows and how pretty they were. I searched for an hour on instagram and couldn’t find them. I was going completely crazy. I then started going to feeds where I thought it might be. It was then that I FINALLY found the rainbow marshmallows! Thanks, Naomi from Baker’s Royale. I have followed you for many years now and love love love your work.

These colorful, squishy, pretty and fantastic globs of love are perfect for kids parties, easter, and more! I gave them to my little nieces who gobbled them up with HUGE smiles on their faces. A friend of mine even said they tasted better than the kind you buy at the store, thanks, Jenn! 🙂 Anyway, they’re a must and pretty easy to make. The only drawback are the dishes, womp womp…

TFCMarshmallows1
Print Recipe
Fairy Marshmallows
These colorful, squishy, pretty and fantastic globs of love are perfect for kids parties, easter, and more! I gave them to my little nieces who gobbled them up with HUGE smiles on their faces. A friend of mine even said they tasted better than the kind you buy at the store, thanks, Jenn! 🙂 Anyway, they’re a must and pretty easy to make. The only drawback are the dishes, womp womp…
Prep Time 25 minutes
Passive Time 8 hours
Servings
4
Ingredients
Prep Time 25 minutes
Passive Time 8 hours
Servings
4
Ingredients
Instructions
  1. Lightly cover a 9×13 pan with nonstick spray; line with parchment paper. (This will help keep the parchment paper in place).
  2. Pour 1/2 cup water into a stand mixer bowl fitted with the whisk attachment. Sprinkle gelatin on top. Set aside.
  3. In the meantime, put 1 cup water, sugar, and honey in a small medium saucepan over medium heat. Cook until sugar dissolves. Once sugar dissolves continue to cook the mixture without stirring until temperature reaches 240 degress F, about 12-15 minutes. Remove from heat and dip the bottom of the saucepan in a metal bowl filled with ice water and allow to cool to 210 degrees F. (this will happen very fast)
  4. Pour slightly cooled syrup mixture into gelatin mixture; beat on low until combined. Increase speed to high and beat until thick and fluffy and mixture triples in volume, about 10 minutes. Working quickly, divide mixture into four separate bowls and mix in food color (one color to each bowl). Using a lightly oiled spatula, scrape and layer each color into prepared pan. Using a lightly oiled knife or offset spatula drag and swirl it through the mixture to create a marbled effect. Do not over do. Smooth top surface (surface may not be completely even). Set aside in a cool place, (not the refrigerator) for 8 hours or overnight. Use a lightly oiled serrated knife and slice into 1 inch cubes. Cover cut sides with cornstarch and confectioner sugar mixture. Marshmallows will keep in an airtight container for up to 5 days.
Recipe Notes

-Have at least 3 spatulas on hand.

-Spray them with non-stick spray before even thinking about touching the marshmallows.

-When lowering the temperature of the candy mixture, put the sauce pan in a bowl of ice water- this will cool the whole amount faster.

-always. always, always use a candy thermometer and never under or over cook

-I like gel colors, not the liquidy watered down mess from the grocery store.

Sriracha Caramel Brussel Sprouts

Brussel Sprouts Fish Caramel 5

There’s a restaurant in Houston and Austin (Texas) called Uchi and they make the best brussel sprouts I have ever had. Back when these babies were all the rage, yes, I’m a little late, many restaurants tried to duplicate this recipe. Some were successful and some put a slight spin on them. Those of you who haven’t tried this dish, now is your chance. The best way I can describe it is crunchy, soft, salty, sweet and spicy. There’s really a lot going on.

I found a few recipes but then adapted it to suite my taste buds. Most of the recipes used a deep fryer, which makes the outside nice and crispy but the inside tender. The best way to achieve this is baking at a high temperate and making sure the sprouts are even in size. My recipe is NOT fried and healthier than their version! Though there is sugar, 3 tablespoons to be exact. But a little sugar doesn’t hurt anyone. 🙂

This Sriracha Caramel Fish Sauce Brussel Sprout recipe is the perfect addition to your holiday table. Your friends and family will love you, I promise. You can find the recipe here on Monica’s blog, Classy & Fabulous.

Brussel Sprouts Fish Caramel 4
Print Recipe
Sriracha Caramel Brussel Sprouts
Sriracha Caramel Brussel Sprouts also found on www.classandfab.com.
Prep Time 10 minutes
Cook Time 20 minutes
Servings
Ingredients
Prep Time 10 minutes
Cook Time 20 minutes
Servings
Ingredients
Instructions
  1. Preheat oven to 425. While the oven is heating, wash and trim brussel sprout ends. If the sprouts are really large, cut them in half.
  2. Prepare a baking sheet lined with foil. Spray generously with non-stick cooking spray. Toss sprouts with oil and bake for 15-20 minutes or until crispy.
  3. While the sprouts are cooking, place the sugar in a saucepan. Cook stirring with a high heat spatula until amber. Slowly pour in lemon juice, fish sauce, sriracha, garlic, and ½ c hot water. The sugar syrup may clump but keep cooking it until it melts and reduces. Add black pepper, remove from heat and set aside.
  4. Put sprouts in a serving dish and generously pour the sauce over them. Serve immediately.

Mozzarella Chicken with Blistered Tomatoes

I really enjoy a good food challenge. I was asked to create a dish for a family of 4 for under $10. The only way I could do this was by shopping at ALDI. They have very affordable produce that allowed me to conquer this challenge. They also don’t provide shopping bags which is perfect because phew I always bring my own when I shop 🙂
This recipe is my take on caprese chicken though if the challenge allowed for a few more dollars, I would have added a basil balsamic drizzle. I like making chicken thighs every once in a while since it has a higher fat content compared to chicken breast. The fat content allows for juicy meat though you can still achieve this with chicken breast when marinating or brining.
The combo of juicy meat, salty smooth mozzarella and tangy sweet tomatoes is the perfect mix. The spinach is the best green addition. I always try to add a green veggie to all of my meals for my customers and myself. I hope your family loves this dish as much as mine does!
TheFoodieChef Mozzarella Chicken2
TheFoodieChef Mozzarella Chicken3
TheFoodieChef Mozzarella Chicken4
TheFoodieChef Mozzarella Chicken5
 
Print Recipe
Mozzarella Chicken with Blistered Tomatoes with Garlic Spinach
The combo of juicy meat, salty smooth mozzarella and tangy sweet tomatoes is the perfect mix.
Prep Time 10 minutes
Cook Time 40 minutes
Servings
4 people
Prep Time 10 minutes
Cook Time 40 minutes
Servings
4 people
Instructions
  1. Preheat oven to 350. Empty washed cherry tomatoes onto a foil lined sheet pan.
  2. Toss with 2T oil, salt and pepper. Bake for 15 minutes or until blistered.
  3. Place chicken thighs onto foil lined baking sheet, toss with oil, salt, pepper, and garlic powder. Bake 15-20 or until instant thermometer reads 165.
  4. Thaw spinach according to packaging. Squeeze out remaining water and transfer to a skillet with 1T oil. Add salt, pepper, and garlic powder to taste. Squeeze half of a lemon on top, set aside.
  5. Slice thin pieces of mozzarella. Place 1 piece on each chicken thigh. Bake for 4 minutes or until cheese is melted.
  6. Arrange a bed of spinach on a platter then add the chicken cascading onto the next piece. Then sprinkle the blistered tomatoes on top. Viola! You have dinner for 4 under $10!

Sour Cherry Deep Dish Pie

cherry pie 3

It has been years since I’ve made a homemade pie, maybe since pastry school. These days all of my effort is put into savory food and it’s a treat (pun intended 😉 ) to make a dessert every so often. Fresh cherries are in season and this is what I’m bringing to a friend’s July 4th party.

I took a little bit of a shortcut and bought pie dough. Now, I’m all about homemade food but sometimes it’s ok to make an exception when you’re in a pinch. I didn’t have pie weights so I used a nine inch cake pan to help weigh the dough down while cooking. There’s nothing worse than hard dough bubble that cannot be popped only to ruin your entire pie. When I pulled the pan out of the springform pan, I noticed some cracks in the dough. I quickly remembered that my reserved small piece of raw dough could be filled in, *thank you pastry school.

cherries 1
pitting cherriescherries 2

cherries 3

dough

cherry pie 2 cherry pie 4
Print Recipe
Sour Cherry Deep Dish Pie
Prep Time 15 minutes
Cook Time 50 minutes
Passive Time 1 hour
Servings
6 people
Ingredients
Egg wash
Prep Time 15 minutes
Cook Time 50 minutes
Passive Time 1 hour
Servings
6 people
Ingredients
Egg wash
Instructions
  1. For the egg wash : whisk together egg and salt.
  2. Preheat oven to 350.
  3. Place the pitted cherries in a bowl. Stir in the vanilla. In a small bowl, whisk together the sugar and cornstarch, and sprinkle the mixture over the cherries.
  4. Toss the sugar and cornstarch mixture with the cherries until they are evenly coated then set aside
  5. Roll the dough out so that it fits in a 9” spring form pan. Reserve the second pie dough for the lattice top. Work fast as the dough is hard to work with when it warms up. If the dough doesn’t fit perfectly, you can piece it together by pressing the edges to meet. Make sure there aren’t any thin spots since the dough is very delicate. Once it’s in the pan, prick all around with a fork. This helps the steam exit causing fewer bubbles. I placed an 8” cake pan inside to weigh it down but if you have pie weights, please use them! Cook for about 5-7 minutes until cooked.
  6. Pour the cherry mixture into the cooked crust. Cover the top of the pie with the chilled, rolled top crust, or cut into strips and make a lattice crust over the top. Crimp the edges and chill for 20 minutes.
  7. Preheat the oven to 425° F. After pie has chilled, brush the top with egg wash and sprinkle with sugar (optional). Place in preheated oven and bake for 20 minutes at 425°. Reduce the heat to 350° and continue to bake for another 20-25 minutes, or until the crust is golden brown and the filling is bubbling. Allow to cool for at least 1 hour before serving.
  8. *This recipe is more on the crumble side to please serve with ice cream 🙂
Recipe Notes

Hint – I had a few cracks in my dough so I filled them in with raw dough, works like a charm 🙂