Cajun Seasoned Kale Chips

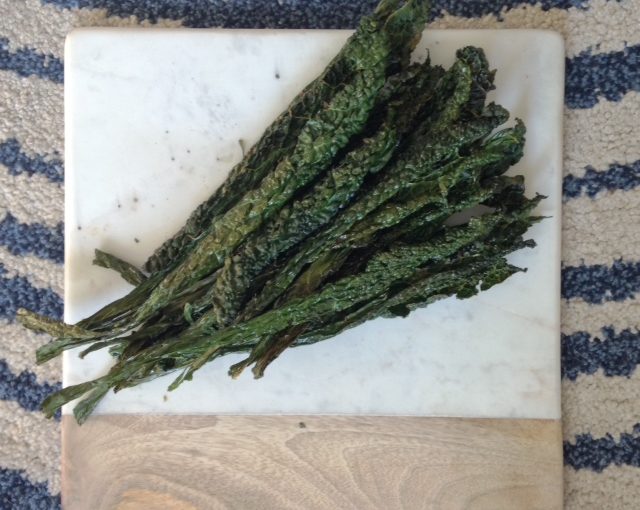
I’m always looking for a healthy snack and these kale chips are just it! They have a hint of spice and are good enough for the carnivorous fiance to approve of. These were all of the hype about a year ago but i’m bringing them back because they’re so delicious.  You can season them with so many different flavors: parm, salt & pepper, garlic powder, cumin, chipotle powder, taco seasoning, etc.

Did I mention how healthy they are for you? Kale is the richest source of carotenoids in the leafy-green vegetable family, making it a top cancer-fighter. Cancer fighter? I’m in!

photo 5 (1)

First start out by washing the kale and preheating the oven to 425 degrees.

Kale 1

I like dinosaur kale because of its texture but you can also use other varieties.

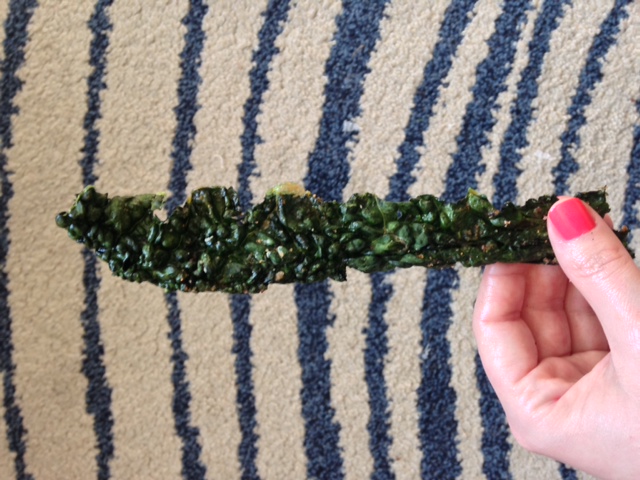
Tear the leaves off from the stem keeping them together.

Kale 2

Dry them with a paper towel then add grapeseed oil. Spread them evenly, be sure not to crowd them as they will steam and not crisp up. Sprinkle your chosen seasoning on top. Bake for about 7 minutes depending on your oven. Be sure not to over cook them- they will burn! (it happened to one of my batches, eek!)

Kale 3

They’re light and crispy like a chip and healthy! What more can you ask for?

kale 5


Print Recipe
Cajun Seasoned Kale Chips
Vegan, Gluten Free, Dairy Free
Prep Time 5 minutes
Cook Time 7 minutes
Servings
6
Ingredients
Prep Time 5 minutes
Cook Time 7 minutes
Servings
6
Ingredients
Instructions
  1. Preheat oven to 425 degrees F.
  2. Clean the kale thoroughly then peel back the leaves from the stem leaving them in long pieces.
  3. Dry the leaves then toss them with grapeseed oil on a parchment lined cookie sheet.
  4. After tossing them in oil, sprinkle the cajun seasoning on top.
  5. Bake for 7 minutes, or until crisp. Keep an eye on them! You don't want them to burn.
Recipe Notes

When spreading out the kale on a cookie sheet, make sure you don't put them too close together. They will steam instead of crisp up.

Best Cinnamon Rolls Ever

One day I was searching for the best cinnamon roll recipe. I could have easily bought the pillsbury stuff but that’s too easy. Homemade dough is always better. I searched through pinterest and found this great recipe that had a secret ingredient. This ingredient was the key  to the moist, fluffy, delicious texture and flavor. They were a hit at the brunch I went to. So if you want to wow your friends, I suggest you make these.


Print Recipe
Best Cinnamon Rolls Ever
Servings
4
Ingredients
Cream Cheese Icing
Servings
4
Ingredients
Cream Cheese Icing
Instructions
  1. Preheat over to 350.
  2. In a small bowl, combine water and yeast. Stir until dissolved, about 5 minutes.
  3. After, mix pudding according to the packaged instructions with milk.
  4. Then add sugar, 1/2 cup melted butter, egg, and salt. Mix well.
  5. Gradually add flour and mix with dough hook. After, knead by hand into a ball.
  6. Place the dough into a large greased bowl. Then cover and let rise in a warm place until it doubles in size.
  7. Punch down and let rise again for a second time.
  8. Roll dough on a very large floured surface.
  9. Dough should roll out to a long rectangle, about 34 x 21"
  10. Take 1 cup of melted butter and spread over entire dough surface using a pastry brush.
  11. In a small bowl, combine brown sugar, cinnamon, and raisins.
  12. Sprinkle mixture over top of buttered dough. Roll dough up like a jelly roll.
  13. Measure dough every 2 inches and cut with a knife.
  14. Place each roll in a buttered baking pan and allow to rise in a warm place for about 20 minutes.
  15. Bake in a preheated oven and bake until golden brown, about 15-20 minutes.
  16. Once out of the oven, slather the cream cheese mixture on top.
Recipe Notes
Enjoy these warm 🙂

:: Donut Breakfast Sandwich ::

Happy New Year! I know, I know, everyone starts their diets in the beginning of the new year. It’s the time to say bye-bye to sweets and treats.  Do you really keep to this? I like to trick myself and eat more greens yet still have treats! I mean, come on, it’s not fun cutting out scrumptious desserts. It’s so hard to resist delicious sweets, especially a donut egg sandwich. Besides, you’re only eating one donut and one isn’t that bad, right?

I came up with this idea when the donut burger was all the hype. I thought it would be a grand idea to cook some canadian bacon, onions, and garlic then add a fried egg to it. It’s the perfect balance, you get the sweet from the crunchy yet soft glazed donut, the saltiness from the garlicy fried egg, and the creaminess from the avocado and Boursin cheese.  Watch the video to see how it’s made. I’m positive that it will blow your socks off.

Print Recipe
Donut Breakfast Sandwich
Instructions
  1. Preheat pan and add butter.
  2. While the butter is melting, cut the donut in half and spread boursin cheese on one side and jam on the other.
  3. Spread sliced avocado and tomato on top of the cheese.
  4. Add the onion and shallot to the pan and cook until translucent. Then add the canadian bacon.
  5. Once the the bacon is slightly crisp, add an egg and fry topping with salt and pepper.
  6. When the egg is flipped and cooked to medium.
  7. Place egg on top of tomato, put the other half donut on top- ta da!
Recipe Notes

If you're feeling funky, try making it with a specialty { blueberry cake, apple fritter } donut. Let me know how that is!

:: Pretzel Balls & Bacon Jam ::

The theme lately, with me, seems to be salty and sweet (last post).  Salty, fluffy, crispy, and chewy pretzel balls paired with sweet, savory, chewy and flavorful bacon jam. What more could you ask for? Your tastebuds will be dancing once you eat these nuggets dipped in heaven.  This will be a hit at your holiday party, superbowl party, or even just lounging on a lazy Sunday.

I made these recipes for the first time a year ago and it was a hit at our friends superbowl party. I made the jam the day before because it takes almost 4 hours to cook in the crock pot. Our apartment smelled of warm, sweet bacon which kept us salivating for days. The balls are time consuming as well so get ready to wait for the prize!

 May I present you with…

Here’s how I made the Bacon Jam

Here’s how I made the Pretzel Balls

1 hour later

:: The finished product ::

Print Recipe
:: Pretzel Balls & Bacon Jam ::
Pretzel Balls Adapated from Paula Deen and Bacon Jam adapted from Martha Stewart
Servings
Ingredients
Bacon Jam
Pretzel Balls
Servings
Ingredients
Bacon Jam
Pretzel Balls
Instructions
Bacon Jam
  1. In a large skillet, cook bacon over medium-high, stirring occasionally, until fat is rendered and bacon is lightly browned, about 20 minutes. With a slotted spoon, transfer bacon to paper towels to drain. Pour off all but 1 tablespoon fat from skillet (reserve for another use); add onions and garlic, and cook until onions are translucent, about 7 minutes. Add vinegar, brown sugar, maple syrup, and coffee and bring to a boil, stirring and scraping up browned bits from skillet with a wooden spoon, about 2 minutes. Add bacon and stir to combine.
  2. Transfer mixture to a 6-quart slow cooker and cook on high, uncovered, until liquid is syrupy, 3 1/2 to 4 hours. Transfer to a food processor; pulse until coarsely chopped. Let cool, then refrigerate in airtight containers, up to 4 weeks.
Pretzel Balls
  1. In a large mixing bowl, combine warm water and yeast. When the yeast dissolves/activates, add half of the flour, the butter, salt, and sugar and mix for about 3 minutes. Stir in the remaining flour. Turn dough out onto a floured surface and knead until the dough is no longer sticky. Let the dough rise in a greased, covered bowl until it doubles in size, about 45 to 50 minutes. Punch down the dough and divide into 12 pieces. Roll each piece of dough into 18-inch long ropes. On a greased cookie sheet, shape each rope into a pretzel shape. Let rise again until almost doubled, about 30 minutes.
  2. Preheat oven to 500 degrees F.
  3. In a large non-aluminum dutch oven over high heat, bring 4 cups of water and baking soda to a boil. Using a large spoon, gently lower pretzels into water a few at a time and boil until they float. Return the pretzels the sheet pan and brush with an egg wash then sprinkle with kosher salt. Bake until browned, about 12 minutes.

Fleur de Sel Caramels

//Perfect for Holiday Gifts //

Chewy caramel is a nostalgic flavor for me ever since I tasted a milk dud.  I have many memories of my dad and myself devouring an entire box while watching movies. You can’t help but remember all of the clusters of sugar that get stuck in your teeth. It’s so worth it because they are just that delicious. This is by far the best caramel recipe I have tried. It’s definitely the perfect balance between salty and sweet. I have won many tastebuds over and you can too. Here’s a peak on how I made them.

Thanks for the guest photog, Amy Blose.


Moroccan Cooking with Grandma Lalouf

I had such a pleasure learning the Moroccan way of rustic cooking with my best friend Lindsey and her grandmother.  After a year of asking Lindsey to invite me over to her grandmothers, I was finally granted my wish!  I was invited over to her grandparents lovely home for a very filling lunch with the family and then a cooking lesson.
It was really interesting to hear stories of life in Algeria and Morocco when times were rough.  The style of cooking directly mirrored this. The way grandma cut the eggplant without a cutting board was very minimalistic and interesting to me.  All of the dishes had bold strong flavors from garlic to turmeric. They were all delicious and unique in their own way.  She taught me how to make the eggplant dip which is very similar to babaganoush. The recipe is to follow…

Needless to say, I had a wonderful time and hope to get an invitation back for yet another lesson 🙂


Print Recipe
Grandma Lalouf's Eggplant Dip Recipe
Servings
Ingredients
Servings
Ingredients
Instructions
  1. Cook eggplant in oil for 10 minutes then remove. Cook tomato for about 10 minutes. Add eggplant, garlic, chili oil and salt to cooked tomato. Simmer for 1 hour uncovered.
  2. This dip not only can be served with pita chips, vegetable cridite, but even spread on bread for a different sandwich!
  3. Cooking option 2: leave out the tomato and add lemon juice (to taste) and cumin (1 tsp)
  4. Enjoy!

Pork and Prawn Dumplings


I felt inspired to make these delicious purses of yummyiness from eating dim sum. I’ve had the greatest opportunity to share a few dim sum meals with my Chinese friend Kevin and his family. It’s honestly the best way to try dim sum. They order, you eat. After making these lumps of love, it has made me have much respect for dim sum makers. You need lots of patience to give some love to each dumpling. They were oh so good; especially dipped in a mixture of sweet chili sauce and soy sauce.

Print Recipe
Pork and Prawn Dumplings
adapted from Ching-He Huang
Servings
Ingredients
Pork and Prawn Filling
Dumplings
Servings
Ingredients
Pork and Prawn Filling
Dumplings
Instructions
  1. Mix the pork, prawns, onion, ginger, soy sauce rice wine, cornstarch, sesame oil, salt, and pepper in a bowl. Stir to combine the ingredients.
  2. Take 1 wonton wrapper and place 2 teaspoons of the filling in the center. Brush the wonton wrapper with egg wash to prevent wrappers from opening up and separating from the filling once cooked. Then, gather up the sides of the wrapper and mold it around the filling into a ball-like shape, leaving the center exposed. You can top each dumpling with a Goji berry for some added color and flavor. *Note* Cover unused wonton wrappers with a damp towel to keep them moist.
  3. Oil the bottom of a bamboo steamer and line it with parchment paper. Arrange the dumplings in the steamer, cover with a lid and place it over a pan of boiling water, making sure the water does not touch the base of the steamer. Steam the dumplings for 6 to 8 minutes, or until cooked.
  4. Meanwhile, combine the chile, and soy sauce into a bowl. Serve alongside the dumplings.
  5. You can switch up the meat if you don't enjoy either pork or prawn. Beef would be a great substitute!

Fava Bean Puree

Fava beans are amazing legumes! They’ve been around for over 5,000 years and are staples in diets around the world. The beans taste meaty in texture yet smooth. They are fantastic for our bodies as they contain L-dopa (dopamine) which aids in memory and prevents Parkinson’s Disease. They are also high in fiber, protein, Vitamins A & C, and low in sodium. They’re pretty much a power bean. 

I was given an assignment in culinary class asking that I choose a vegetable and present it. Fava beans were my choice and that’s where the video came in. I was lucky enough to get my favorite creative people at Cut to Create to make this video of me making the dish.

The Foodie Chef Makes Fava Bean Puree from Cut to Create on Vimeo.

Print Recipe
Fava Bean Puree
Servings
Ingredients
Servings
Ingredients
Instructions
  1. Shell the fava beans, blanch them in boiling water for 5 minutes. Shock them in cold water then peel the outer shell off. The beans should come out to be about 1 cup (not much compared to the 2 lbs you just bought). Combine the beans, Parmesan, garlic, cilantro, lemon zest & juice, and blend in a food processor. While blending, slowly drizzle in the olive oil. After, add salt and pepper to taste.
  2. Substitutions You can sub cilantro for parsley or basil. Playing with these flavors will give you a tasty results. If using basil, it may taste more like a pesto without nuts or hummus.
  3. Tips These beans are quite labor intensive so get ready to work your hands for a good 30 minutes. I would recommend not using a really flavorful olive oil. The second time I made it, the oil gave it too much of an overpowering fruity flavor. Also, hold the salt until the end, real Parmesan tends to be salty by itself.
  4. Spread this lovely puree over a toasted sliced baguette, it's sure to please your taste buds! If you want to garnish, I recommend using something inside the puree: shaved Parmesan, cilantro leaf, a cooked fava bean, or lemon zest to add color. Enjoy!