Slender Sloppy Joes


I’m totally embarrassed to realize that I haven’t posted a recipe in an entire year. This year has been filled with joy, fuzziness, changes and unable to be focused. That’s what a new baby does! (I had a baby!)

I finally realized I needed to take a break from being a personal chef and become a full-time mom (I feel so lucky and fortunate to do so.) I’m extremely happy to say that I will be sharing some of my tried and true recipes!

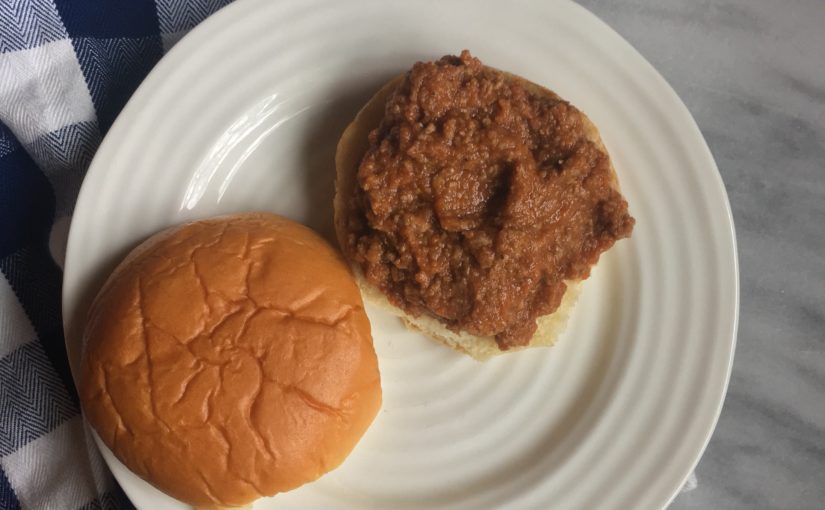
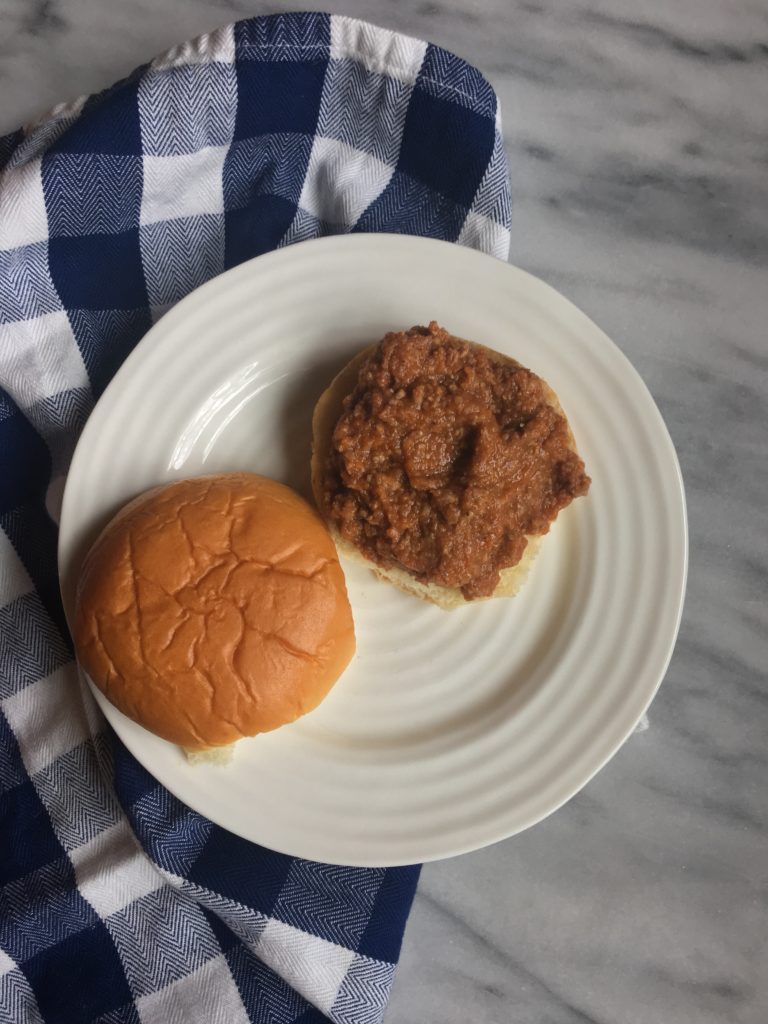
I’m pretty sure I made this slender sloppy joe recipe every other week for about 2 years. There was a family that I cooked for, for over 2 years and they requested it biweekly.  I don’t blame them because it’s so good while packed with hidden veggies (I promise, your kids or husband will have no idea)! It also meant that I had to eat it myself because I would cook for my family at the same time.

Lucky you, I’m finally sharing it! I hope you enjoy it as much as my clients did.

Print Recipe
Slender Sloppy Joes
Course Main Dish
Prep Time 15 min
Cook Time 30 min
Servings
7 servings 1/2 c portions
Course Main Dish
Prep Time 15 min
Cook Time 30 min
Servings
7 servings 1/2 c portions
Instructions
  1. Chop all the vegetables using a food processor until blended completely.
  2. Heat a large skillet over medium high heat and add a teaspoon of grapeseed oil, the onion, garlic, carrots, mushrooms and red peppers to the pan. Cook until a lot of moisture has been evaporated.
  3. Mix in the tomato paste then add the beef. Cook until you have broken it up and it’s cooked through.
  4. Reduce heat to medium and add red wine vinegar and Worcestershire sauce, tomato sauce, stir to combine.
  5. Reduce heat and bring to a simmer, cooking for 5 more minutes.
  6. Using a measuring cup, pile 1/2 cup of sloppy meat onto toasted buns.

Unicorn Challah

I have this constant to do list of things I must get done and things I want to get done. Some just keep getting transferred to the next weekly list and that was this challah. As soon as I had to slow down with my job because my pregnant body just couldn’t handle it,  I had some free time to do my little projects.

Ever since I took bread class in pastry school, I liked it but never loved it. I felt like it was slow moving and lots of wait time. This is all true but the key is patients. We did make challah once but I quickly forgot about it. Recently, I went to a challah making class and it intrigued me! The teacher taught us how to stuff it with ingredients like nutella. Once I tasted it, I thought, wow, I can totally play around with color, flavor, etc.

Though I haven’t found my favorite recipe yet, I will share with you my process of coloring and baking it. I’m still playing with the amount of egg yolks to master the perfect fluffy yet chewy texture that I love from my local bagel store who makes the best challah in my opinion. Though it seems like everyone has their own preference on texture. If you have a favorite, please share!

Follow your favorite recipe and mix dough for about 4 minutes. Take the dough out and cut into 3 pieces. Flatten each piece a bit and add color to each, pink, purple and a mixture of sky blue and yellow to make teal. You can use gloves at this point changing them between each color. Or fold it up, bringing each end together so that the color is enclosed in the center.

I added each one individually back into the mixer with the dough hook to finish being mixed making sure the color is distributed. You may have to take it out a bit to mix by hand. After, I put them in separate bowls with oil in them. Make sure to put some oil on top of the dough so that the wet paper towel doesn’t stick. Then cover with plastic wrap and let rise overnight.

The next morning, roll out each piece into a long rope. Braid then cover with a damp cloth for 30 minutes to rise one last time. Once the bread has risen, apply egg wash generously with a brush in every crevice and side. Bake according to your recipe instructions and viola! You now have beautiful unicorn challah!

One last thing: kids go crazy over the colors! My nieces absolutely loved it and they fought over what color they could eat. You can also slice and make into awesome french toast the following day. I have seen variations online to make it more sweet than savory with a sugary glaze over top with sprinkles.

Vegan Creamy Artichoke Dip

VegenSpinachDip3Today I had the pleasure of cooking with the wonderful Stephanie Hoban from Ripe Cuisine. We had such an awesome time sharing stories and bonding over cooking together. She shared her super delicious vegan & gluten free dip with me which is perfect for any party. Since the holidays are so close, it’s a perfect starter or even meal (I pretty much ate the whole thing when she left). There’s hardly any fat so it’s completely guilt-free.

During this time of year, it’s hard to find a healthy crowd pleasing dish. My friends, this is it. Move over queso and hello healthy dip! My husband, who is such a meat and potatoes kind of guy admitted that it’s great! Trust me, it’s creamy, decadent and filling, what’s not to like?

Those of you who don’t know Stephanie, she’s so impressive! She took my dream path. (If only I had known at a younger age nutrition and food was my thing.) She’s a Houston native who studied nutrition at NYU then went off to culinary school. After, she moved back to Houston, had a few jobs then opened her own vegan food truck, Ripe Cuisine. Everything on her truck is homemade, even the ketchup! If you’re in the Houston area, trying her food is a must!

VegenSpinachDip6


VegenSpinachDip5
Print Recipe
Vegan Creamy Artichoke Dip
Creamy Artichoke Dip with Spinach, Basil and Pinenuts by Stephanie Hoban, Ripe Cuisine
Prep Time 10 minutes
Cook Time 20 minutes
Passive Time 10 minutes
Servings
Ingredients
Prep Time 10 minutes
Cook Time 20 minutes
Passive Time 10 minutes
Servings
Ingredients
Instructions
  1. Heat oven to 375 F
  2. Peel zucchini and dice. Add to the bowl of a food processor fitted with the steel blade along with drained and rinsed white beans, Vegenaise, nutritional yeast, non-dairy milk, lemon juice, salt, red chili flake, and black pepper. Process until very smooth.
  3. In a large sauté pan heat oil and sauté onions and garlic until soft, about 5 minutes. Add in spinach and sauté on low until wilted. Strain spinach, pressing out as much water as possible, and set aside. In the same pan, sauté roughly chopped artichokes with lemon juice in the pan juices until soft and edges brown. Add back spinach and sauté 1 minute longer.
  4. With the motor of the food processor running, add in potato flour 1 teaspoon at a time. {The mixture should thicken considerably]. Add the pureed zucchini and beans to the pan with artichokes and spinach. Remove from heat and stir in chopped basil.
  5. Transfer dip to an oven safe casserole pan, drizzle with garlic oil, if using, and sprinkle on pinenuts. Bake for 20 minutes, and broil for 1 – 2 minutes to achieve a golden top. Allow to sit and firm up for at least 10 minutes before serving.
Recipe Notes

Ripe Tip: By substituting the canned beans and zucchini in place of cheese you save a load of calories, fat and cholesterol in favor of protein, fiber, vitamins and minerals. Serve with your favorite crackers, corn chips, or pita.


The Best Latkes

TheFoodieChefLatke3

I always look forward to this time of year. The weather is cold (sometimes in Houston) and we get to eat yummy fried potato cakes, latkes. My whole family gets together and we throw a Hanukkah party with presents, gelt (chocolate coins), dreidels and best of all, latkes!

I have a confession: I’ve never made them before yesterday. My mom was always the chef and man does she make good latkes. This year, per my job, it’s my turn to make them. I had a minor freak out in trying a recipe but I was able to add a few things to make it better. Combining recipes in the thick of things usually works for me. Thankfully, it all worked out and I came up with the best recipe. They’re crunchy on the outside and hashbrown like in the middle. All they need are some applesauce and sour cream!

It is important to follow the recipe step by step because they really are a labor of love. If you miss a step, they aren’t going to turn out right.

TheFoodieChefLatke1

I have 2 major tips that will make a world of a difference:

  1. Squeeze out the shredded potato onion mixture 2 times in a towel.
  2. After scooping the mixture and dropping it into the oil, gently flatten with a spatula.

TheFoodieChefLatke4


Print Recipe
The Best Latkes
Prep Time 10 minutes
Cook Time 8 minutes
Servings
Ingredients
Prep Time 10 minutes
Cook Time 8 minutes
Servings
Ingredients
Instructions
  1. In a food processor fitted with the blade attachment, blend the garlic, shallots and onion.
  2. Change the blade attachment to the shredder. Peel, wash and shred the potatoes. After, empty the mixture into a kitchen towel and squeeze out all of the liquid. Open the towel, fluff the mixture and squeeze 1 more time. You may have to do this in 2 segments, as there will be a lot of the potato mixture.
  3. Empty the drained potato mixture into a large bowl. Add salt, pepper, flour, eggs, and baking powder and mix by hand.
  4. In a large skillet, pour vegetable oil ¼” from the bottom. Heat to medium and test with a small piece of potato- the mixture should sizzle.
  5. Using a 1 ½ Tablespoon scoop, scoop and drop the mixture into the oil. Flatten them out with a spatula to ensure an even distribution. Cook on each side about 4 minutes depending on the heat level. The bottom should be a nice golden brown color.
  6. Once the latke is done cooking, transfer to a cookie sheet lined with foil and 2 paper towels on top. Sprinkle a little salt on top while it’s still hot. Serve immediately.
  7. You can keep them warm in a 300 degree oven until you serve them.
  8. Freezer friendly: put the latkes in a freezer bag and freeze for up to 3 weeks. Place them on a cookie sheet and into a 350 degree oven for 15-20 minutes to re-crisp.
Recipe Notes

I have 2 major tips that will make a world of a difference:

  1. Squeeze out the shredded potato onion mixture 2 times in a towel.
  2. After scooping the mixture and dropping it into the oil, gently flatten with a spatula.

Sriracha Caramel Brussel Sprouts

Brussel Sprouts Fish Caramel 5

There’s a restaurant in Houston and Austin (Texas) called Uchi and they make the best brussel sprouts I have ever had. Back when these babies were all the rage, yes, I’m a little late, many restaurants tried to duplicate this recipe. Some were successful and some put a slight spin on them. Those of you who haven’t tried this dish, now is your chance. The best way I can describe it is crunchy, soft, salty, sweet and spicy. There’s really a lot going on.

I found a few recipes but then adapted it to suite my taste buds. Most of the recipes used a deep fryer, which makes the outside nice and crispy but the inside tender. The best way to achieve this is baking at a high temperate and making sure the sprouts are even in size. My recipe is NOT fried and healthier than their version! Though there is sugar, 3 tablespoons to be exact. But a little sugar doesn’t hurt anyone. 🙂

This Sriracha Caramel Fish Sauce Brussel Sprout recipe is the perfect addition to your holiday table. Your friends and family will love you, I promise. You can find the recipe here on Monica’s blog, Classy & Fabulous.

Brussel Sprouts Fish Caramel 4
Print Recipe
Sriracha Caramel Brussel Sprouts
Sriracha Caramel Brussel Sprouts also found on www.classandfab.com.
Prep Time 10 minutes
Cook Time 20 minutes
Servings
Ingredients
Prep Time 10 minutes
Cook Time 20 minutes
Servings
Ingredients
Instructions
  1. Preheat oven to 425. While the oven is heating, wash and trim brussel sprout ends. If the sprouts are really large, cut them in half.
  2. Prepare a baking sheet lined with foil. Spray generously with non-stick cooking spray. Toss sprouts with oil and bake for 15-20 minutes or until crispy.
  3. While the sprouts are cooking, place the sugar in a saucepan. Cook stirring with a high heat spatula until amber. Slowly pour in lemon juice, fish sauce, sriracha, garlic, and ½ c hot water. The sugar syrup may clump but keep cooking it until it melts and reduces. Add black pepper, remove from heat and set aside.
  4. Put sprouts in a serving dish and generously pour the sauce over them. Serve immediately.

Mozzarella Chicken with Blistered Tomatoes

I really enjoy a good food challenge. I was asked to create a dish for a family of 4 for under $10. The only way I could do this was by shopping at ALDI. They have very affordable produce that allowed me to conquer this challenge. They also don’t provide shopping bags which is perfect because phew I always bring my own when I shop 🙂
This recipe is my take on caprese chicken though if the challenge allowed for a few more dollars, I would have added a basil balsamic drizzle. I like making chicken thighs every once in a while since it has a higher fat content compared to chicken breast. The fat content allows for juicy meat though you can still achieve this with chicken breast when marinating or brining.
The combo of juicy meat, salty smooth mozzarella and tangy sweet tomatoes is the perfect mix. The spinach is the best green addition. I always try to add a green veggie to all of my meals for my customers and myself. I hope your family loves this dish as much as mine does!
TheFoodieChef Mozzarella Chicken2
TheFoodieChef Mozzarella Chicken3
TheFoodieChef Mozzarella Chicken4
TheFoodieChef Mozzarella Chicken5
 
Print Recipe
Mozzarella Chicken with Blistered Tomatoes with Garlic Spinach
The combo of juicy meat, salty smooth mozzarella and tangy sweet tomatoes is the perfect mix.
Prep Time 10 minutes
Cook Time 40 minutes
Servings
4 people
Prep Time 10 minutes
Cook Time 40 minutes
Servings
4 people
Instructions
  1. Preheat oven to 350. Empty washed cherry tomatoes onto a foil lined sheet pan.
  2. Toss with 2T oil, salt and pepper. Bake for 15 minutes or until blistered.
  3. Place chicken thighs onto foil lined baking sheet, toss with oil, salt, pepper, and garlic powder. Bake 15-20 or until instant thermometer reads 165.
  4. Thaw spinach according to packaging. Squeeze out remaining water and transfer to a skillet with 1T oil. Add salt, pepper, and garlic powder to taste. Squeeze half of a lemon on top, set aside.
  5. Slice thin pieces of mozzarella. Place 1 piece on each chicken thigh. Bake for 4 minutes or until cheese is melted.
  6. Arrange a bed of spinach on a platter then add the chicken cascading onto the next piece. Then sprinkle the blistered tomatoes on top. Viola! You have dinner for 4 under $10!

Black Bean & Chickpea Chili

Bean chili 1

When I’m making menu’s for my customers I like to think outside of the box. What can my customers only get from me and not take out? This is the challenge that I struggle with weekly when I make my menu’s. Not to mention following all of their likes and dislikes. On an occasion, I like to throw in a vegetarian dish. Well, almost vegetarian since I love my good ol’ chicken stock. A friend of mine who is a dietician helps me out on occasion when I’m suffering from menu block. She’s obsessed with vegetarian recipes so she’s the inspiration for this one 🙂

When I first tasted this recipe after making it, I ate it for lunch and dinner 3 days straight. Seriously. It has the perfect amount of spice and the beans are so filling. It’s really a healthy comfort food and highly recommend making it. My customers loved it too!

Bean chili 3
Print Recipe
Black Bean & Chickpea Chili
Recipe adapted from Love and Lemons
Servings
4 people
Ingredients
Ingredients
Servings
4 people
Ingredients
Ingredients
Instructions
  1. Heat oil in a large pot over medium heat. Add chopped onion, salt & pepper and stir. Cook until the onion is slightly translucent then add the garlic and peppers. Stir and cook until soft.
  2. Add the canned tomatoes and the chicken stock. Then add the black beans, chickpeas, adobo sauce, corn and seasonings. Cover, reduce heat to low, and cook for 25 more minutes, stirring occasionally.
  3. Taste and adjust seasonings adding more salt and pepper.
  4. Serve with toppings of your choice. Chill the leftovers and store in the fridge for up to 5 days.
Recipe Notes

*To make vegetarian: swap the chicken stock for water or vegetable stock

Spinach & Butternut Squash Lasagna

Lasagna Sometimes I like to partake in Meat-less Monday’s and that’s where the idea for this recipe came from. I’m over the typical bell peppers, onions and mushrooms as the main vegetarian option and I wanted to think of something extra yummy and slightly sweet.  Spinach and roasted butternut squash was the perfect substitute.

I frequent a certain area of town and pass a place called Fabio’s multiple times a week. I had never been in but before making this recipe, I made a quick stop to check it out. I knew they made fresh pasta and needed to see what exactly they offered. The owner was so warm and accommodating. He even cut lasagna pasta sheets to the size of my pans. I will never turn back to the hard dried lasagna sheets again! I’m sticking with fresh all the way 🙂

Below is my best marinara recipe. I was a little hesitant to share but I’ve come to grips that the world needs this recipe. While in culinary school, I interned at a local restaurant, Mockingbird Bistro. The cooks and chef put a lot of love into their marinara sauce and I could taste the complexity of flavors. Taking the time to brown the (mirepoix) celery, carrot and onions makes such a difference in flavor. Each step adds another dimension to the flavor, that’s why I’m in love with this recipe. Also, I took a cooking class in Italy and a lot of the methods were similar and solidified my feelings about it.

Once the lasagna was baked, all of the flavors combined into the best veggie lasagna I have ever made. The corners got a little crispy but I was able to cut around it. The inside was cheesy, sweet and slightly salty- all of my favorite flavors.

Lasagna


Print Recipe
Spinach & Butternut Squash Lasagna
Prep Time 15 minutes
Cook Time 82 minutes
Passive Time 15 minutes
Servings
Ingredients
Ingredients
Best Marinara Sauce
Prep Time 15 minutes
Cook Time 82 minutes
Passive Time 15 minutes
Servings
Ingredients
Ingredients
Best Marinara Sauce
Instructions
Spinach & Butternut Squash Lasagna
  1. Preheat oven to 400 and roast butternut squash for about 30 minutes or until cooked through.
  2. Mix ricotta, ¾ c mozzarella, ¼ c parmesan, salt, pepper and oregano in bowl and set aside.
  3. Reduce heat to 350 and coat 9x13 pan with cooking spray.
  4. Spread 1/2 c tomato sauce (recipe below) on bottom and top with 3 noodles to cover (or 1 if using fresh). Top the noodles with half butternut squash and half spinach. Dollop half ricotta mixture on top then add 1 cup tomato sauce on top. Repeat this layer one more time, pressing down on the filling as you add the layer. Put the remaining sheet(s) on top. Spread the remaining sauce on top then add ¾ c mozzarella and ¼ c parmesan. Cover with foil with cooking spray on the inside.
  5. Bake for 50 minutes. Remove foil and continue to bake 7 more minutes so the cheese browns. Let stand for 15 minutes before serving.
Best Marinara Sauce
  1. Sauté onion, garlic and shallot in olive oil until fragrant. Add celery and carrots. Cook until veggies are brown and soft. A few pinches of salt and pepper along the way to help relieve moisture. Deglaze pan with red wine, scraping the bottom of the pan. Once the liquid has evaporated, add the bay leaf, thyme, tomato paste, and tomato sauce. Stir then cover and simmer for 20 or so minutes. Taste and add salt or pepper. Now, add heavy cream or milk. This will make the sauce less acidic and extra delicious. Stir and cook on low for 5 minutes.
  2. Adaptation: put onion garlic, shallot, carrot, and celery in food processor and grind until there are no visible pieces. Brown this in olive oil for less chunky sauce. Add water if you like it less thick.