Gingerbread Cookies

FCGingerbread5

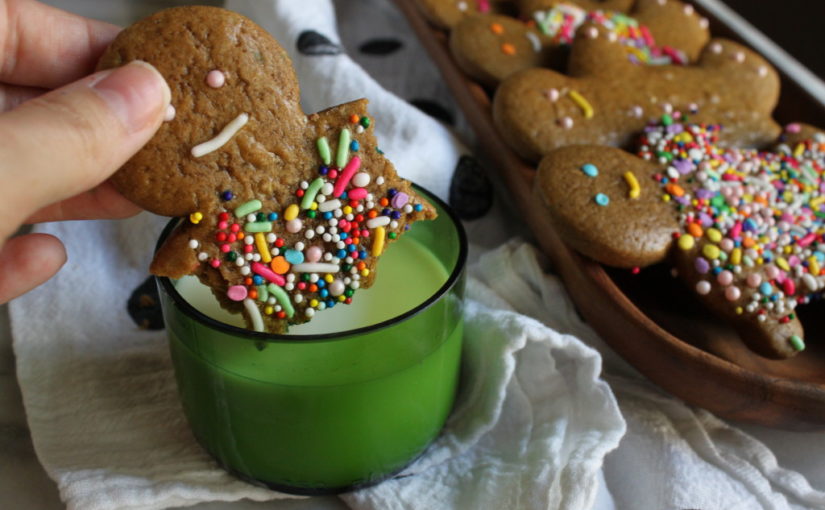
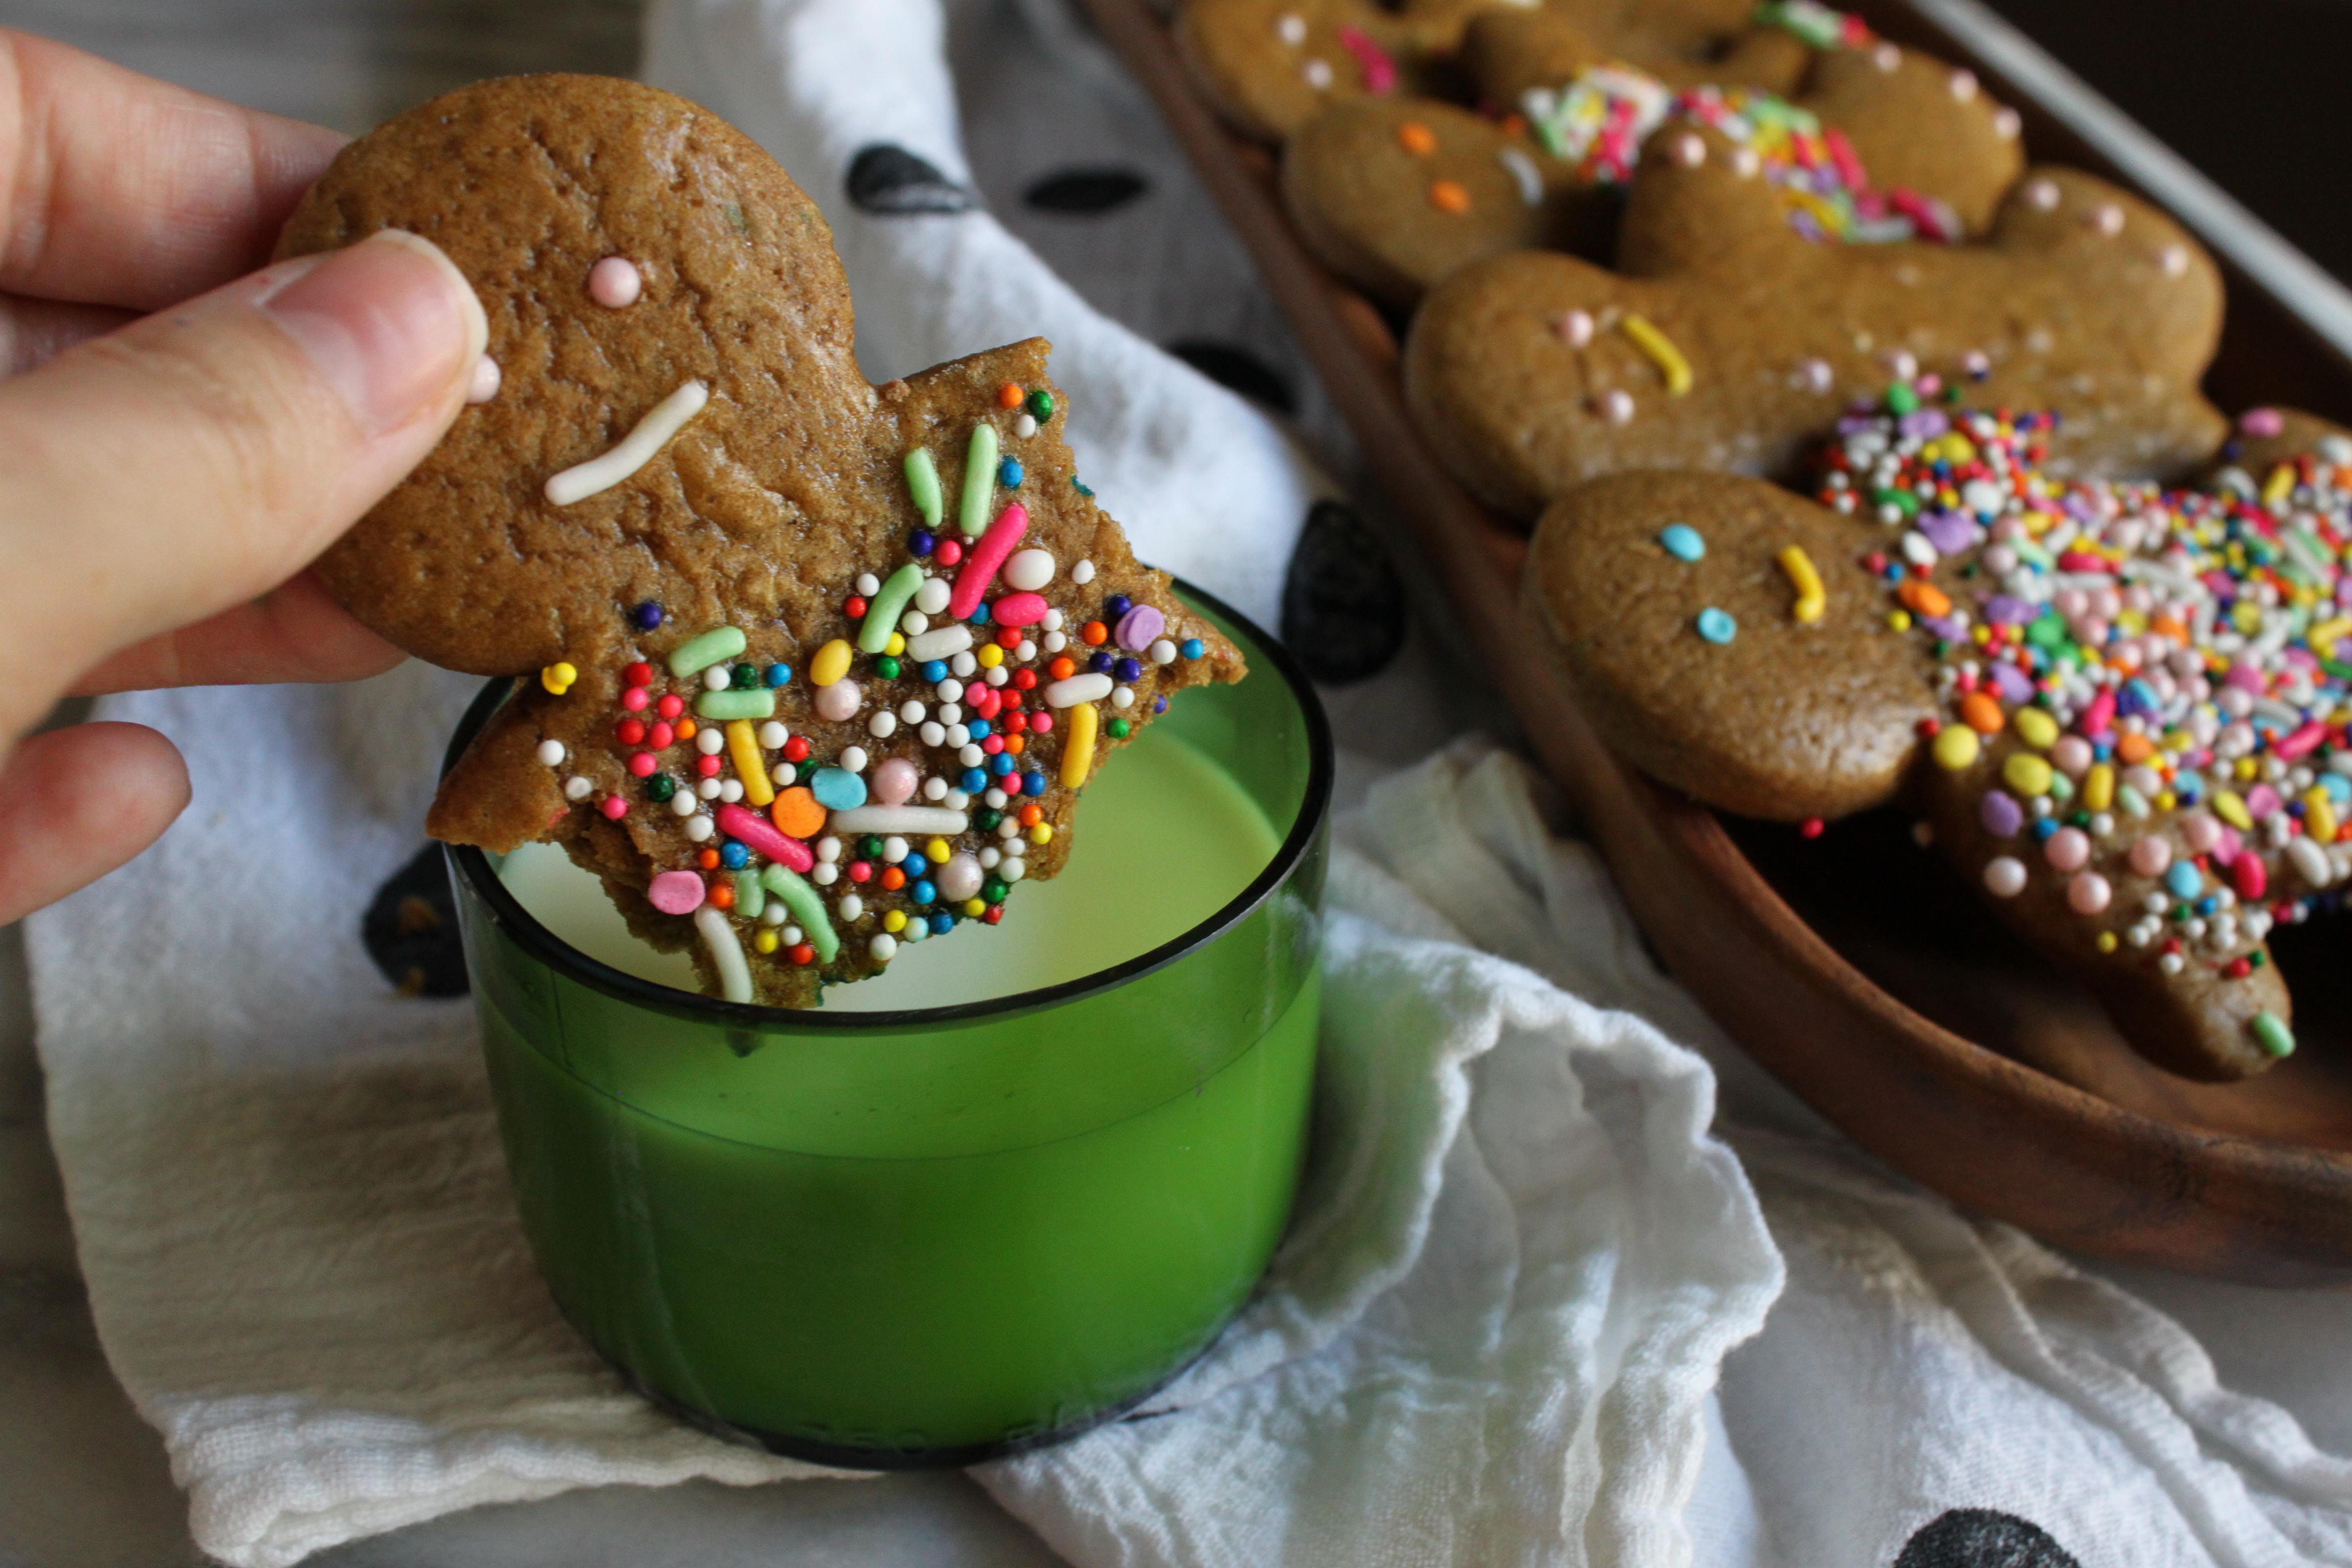
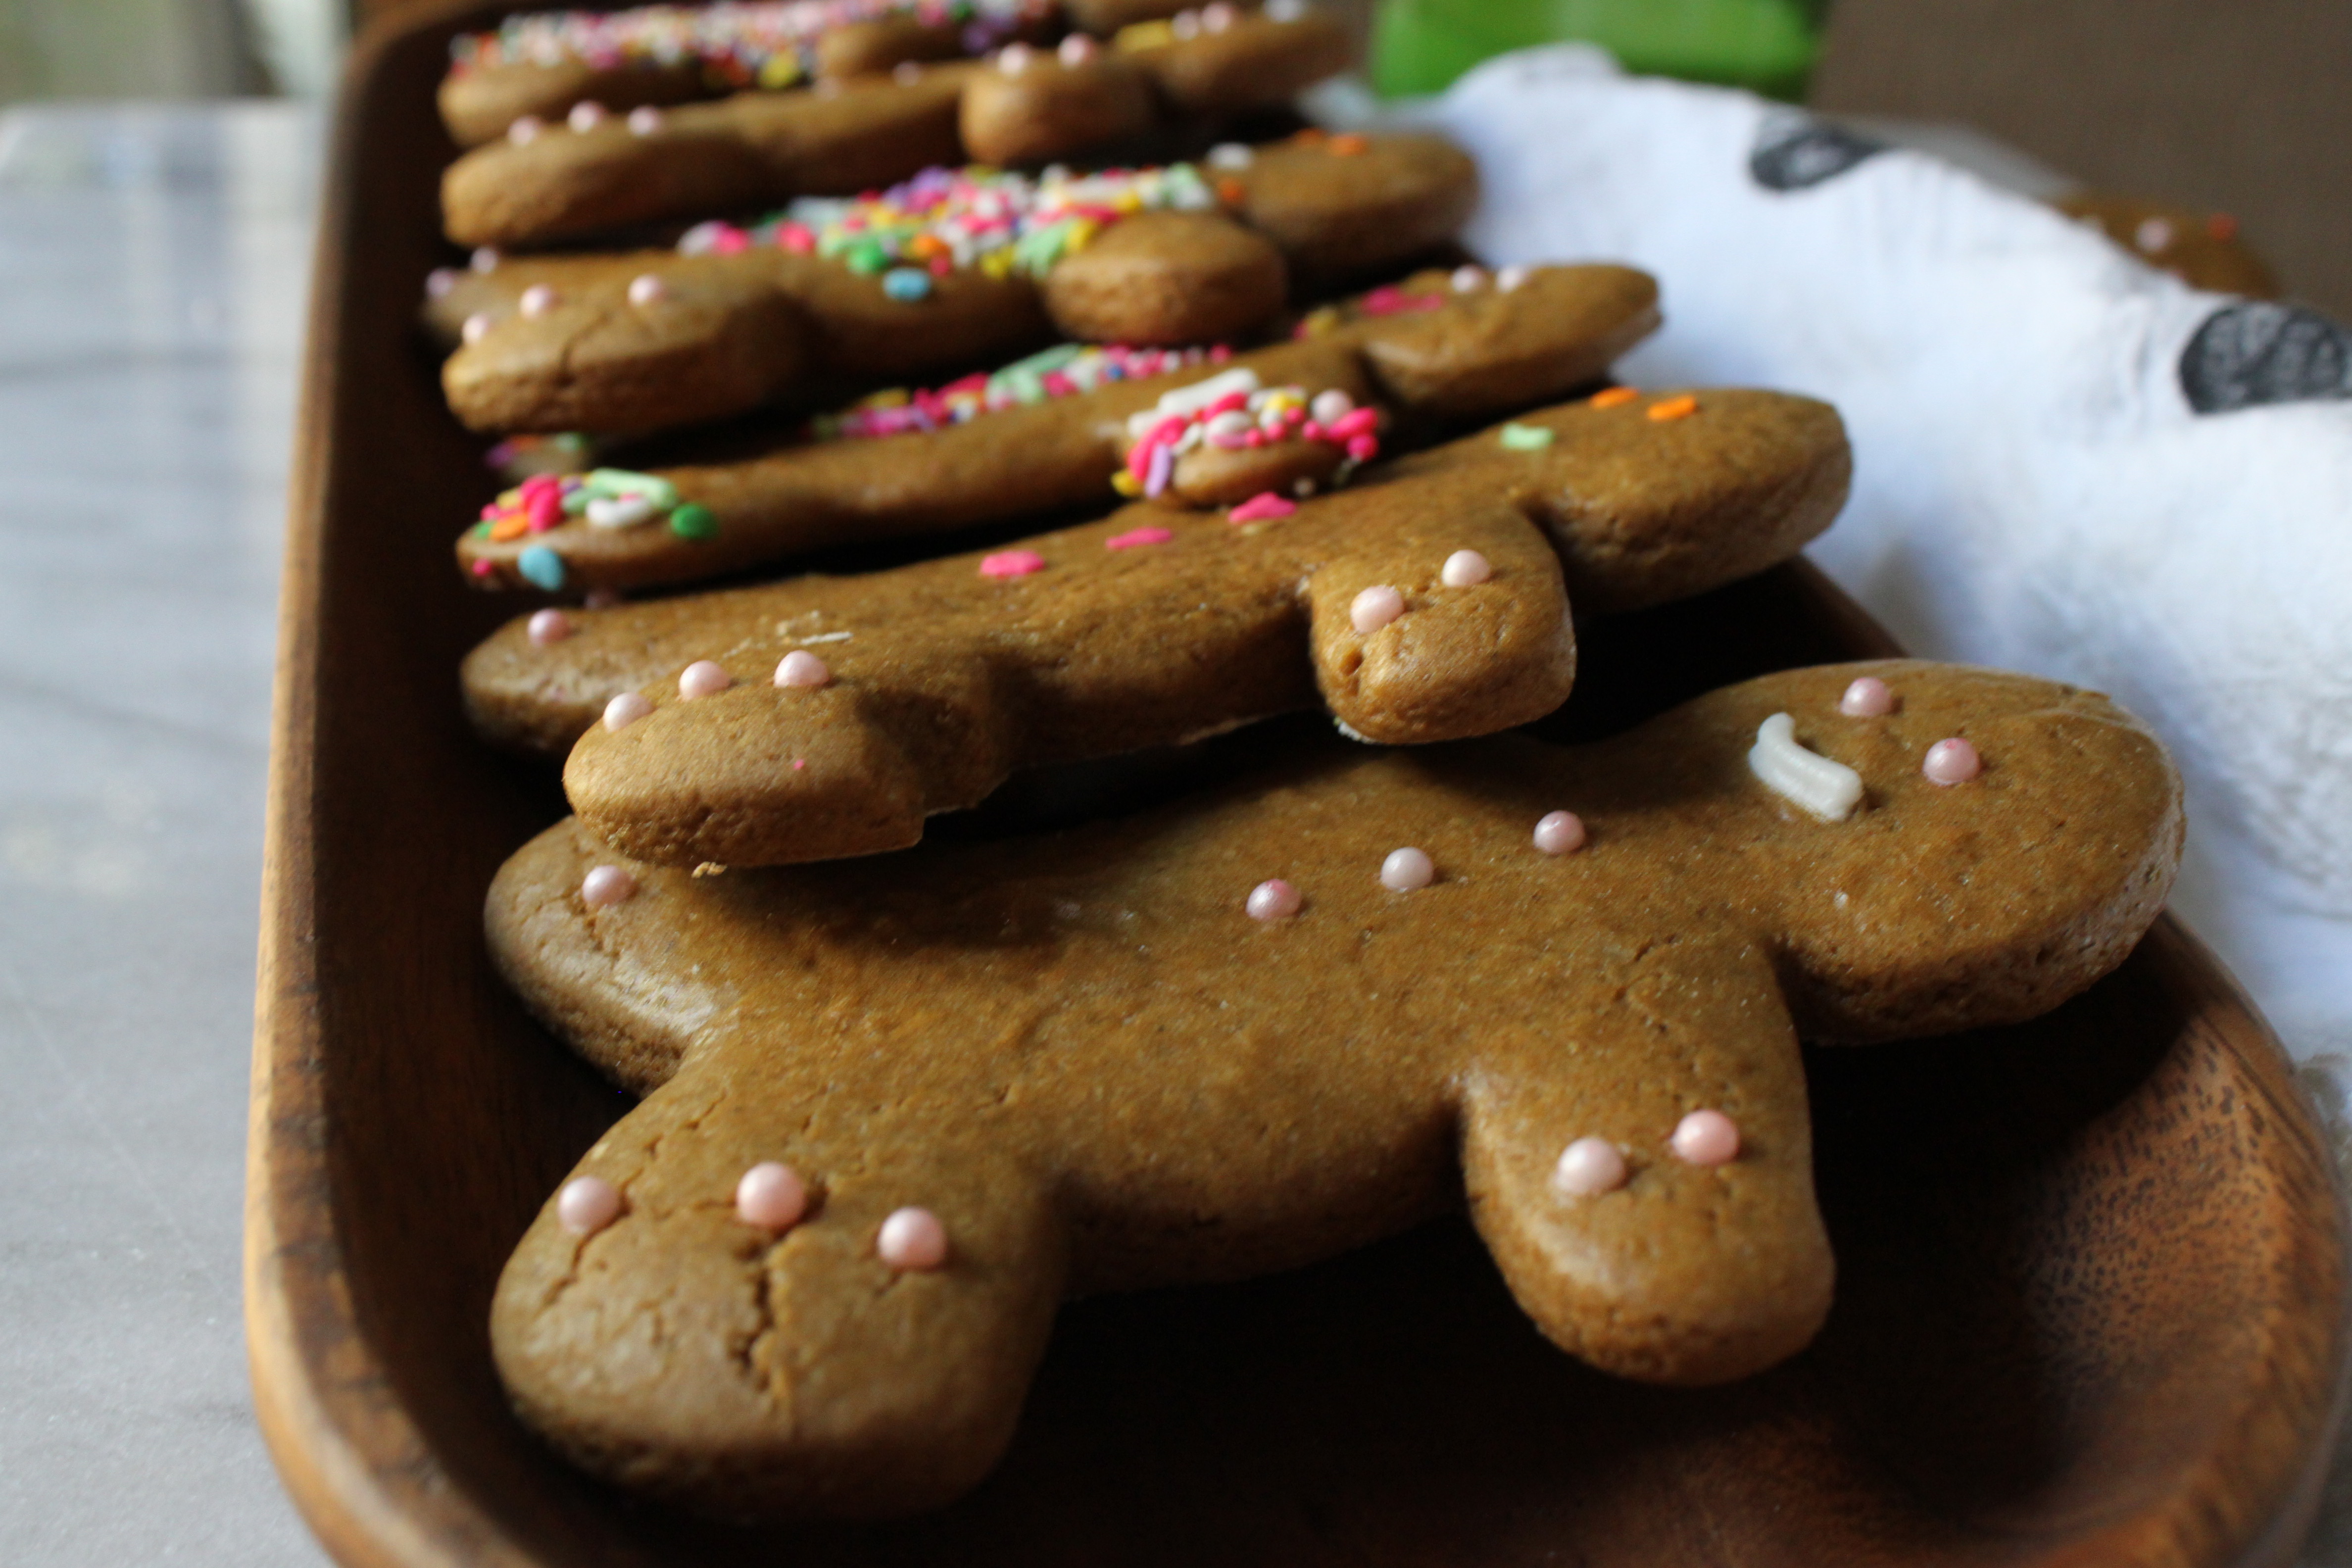
There’s nothing like the taste of fresh and spicy gingerbread men (and women) during the holiday season. As I was making these little people, I couldn’t help but think of the scene from Shrek. Not the gumdrop buttons! haha

While in pastry school my teacher introduced us to speculoos cookies for the holidays. Now, they’re a huge hit at Trader Joe’s in cookie butter form. Ever since we made them in school, I’ve loved the flavor and try to make them every year. This time, I made them in the form of gingerbread people because, come on, it’s pretty much the same thing.  The only difference is the amount of spices you add. I love the flavor of cardamom so I added the non-traditional spice into my beauties 🙂

I have this new found obsession with cute things and sprinkles so here I am again, adding my special sprinkle mix to the gingerbread ladies. However, I did find in my last 2 batches that the sprinkles melted. I assume the temperature raised slightly more than the first batch. Keep this in mind when baking with sprinkles.

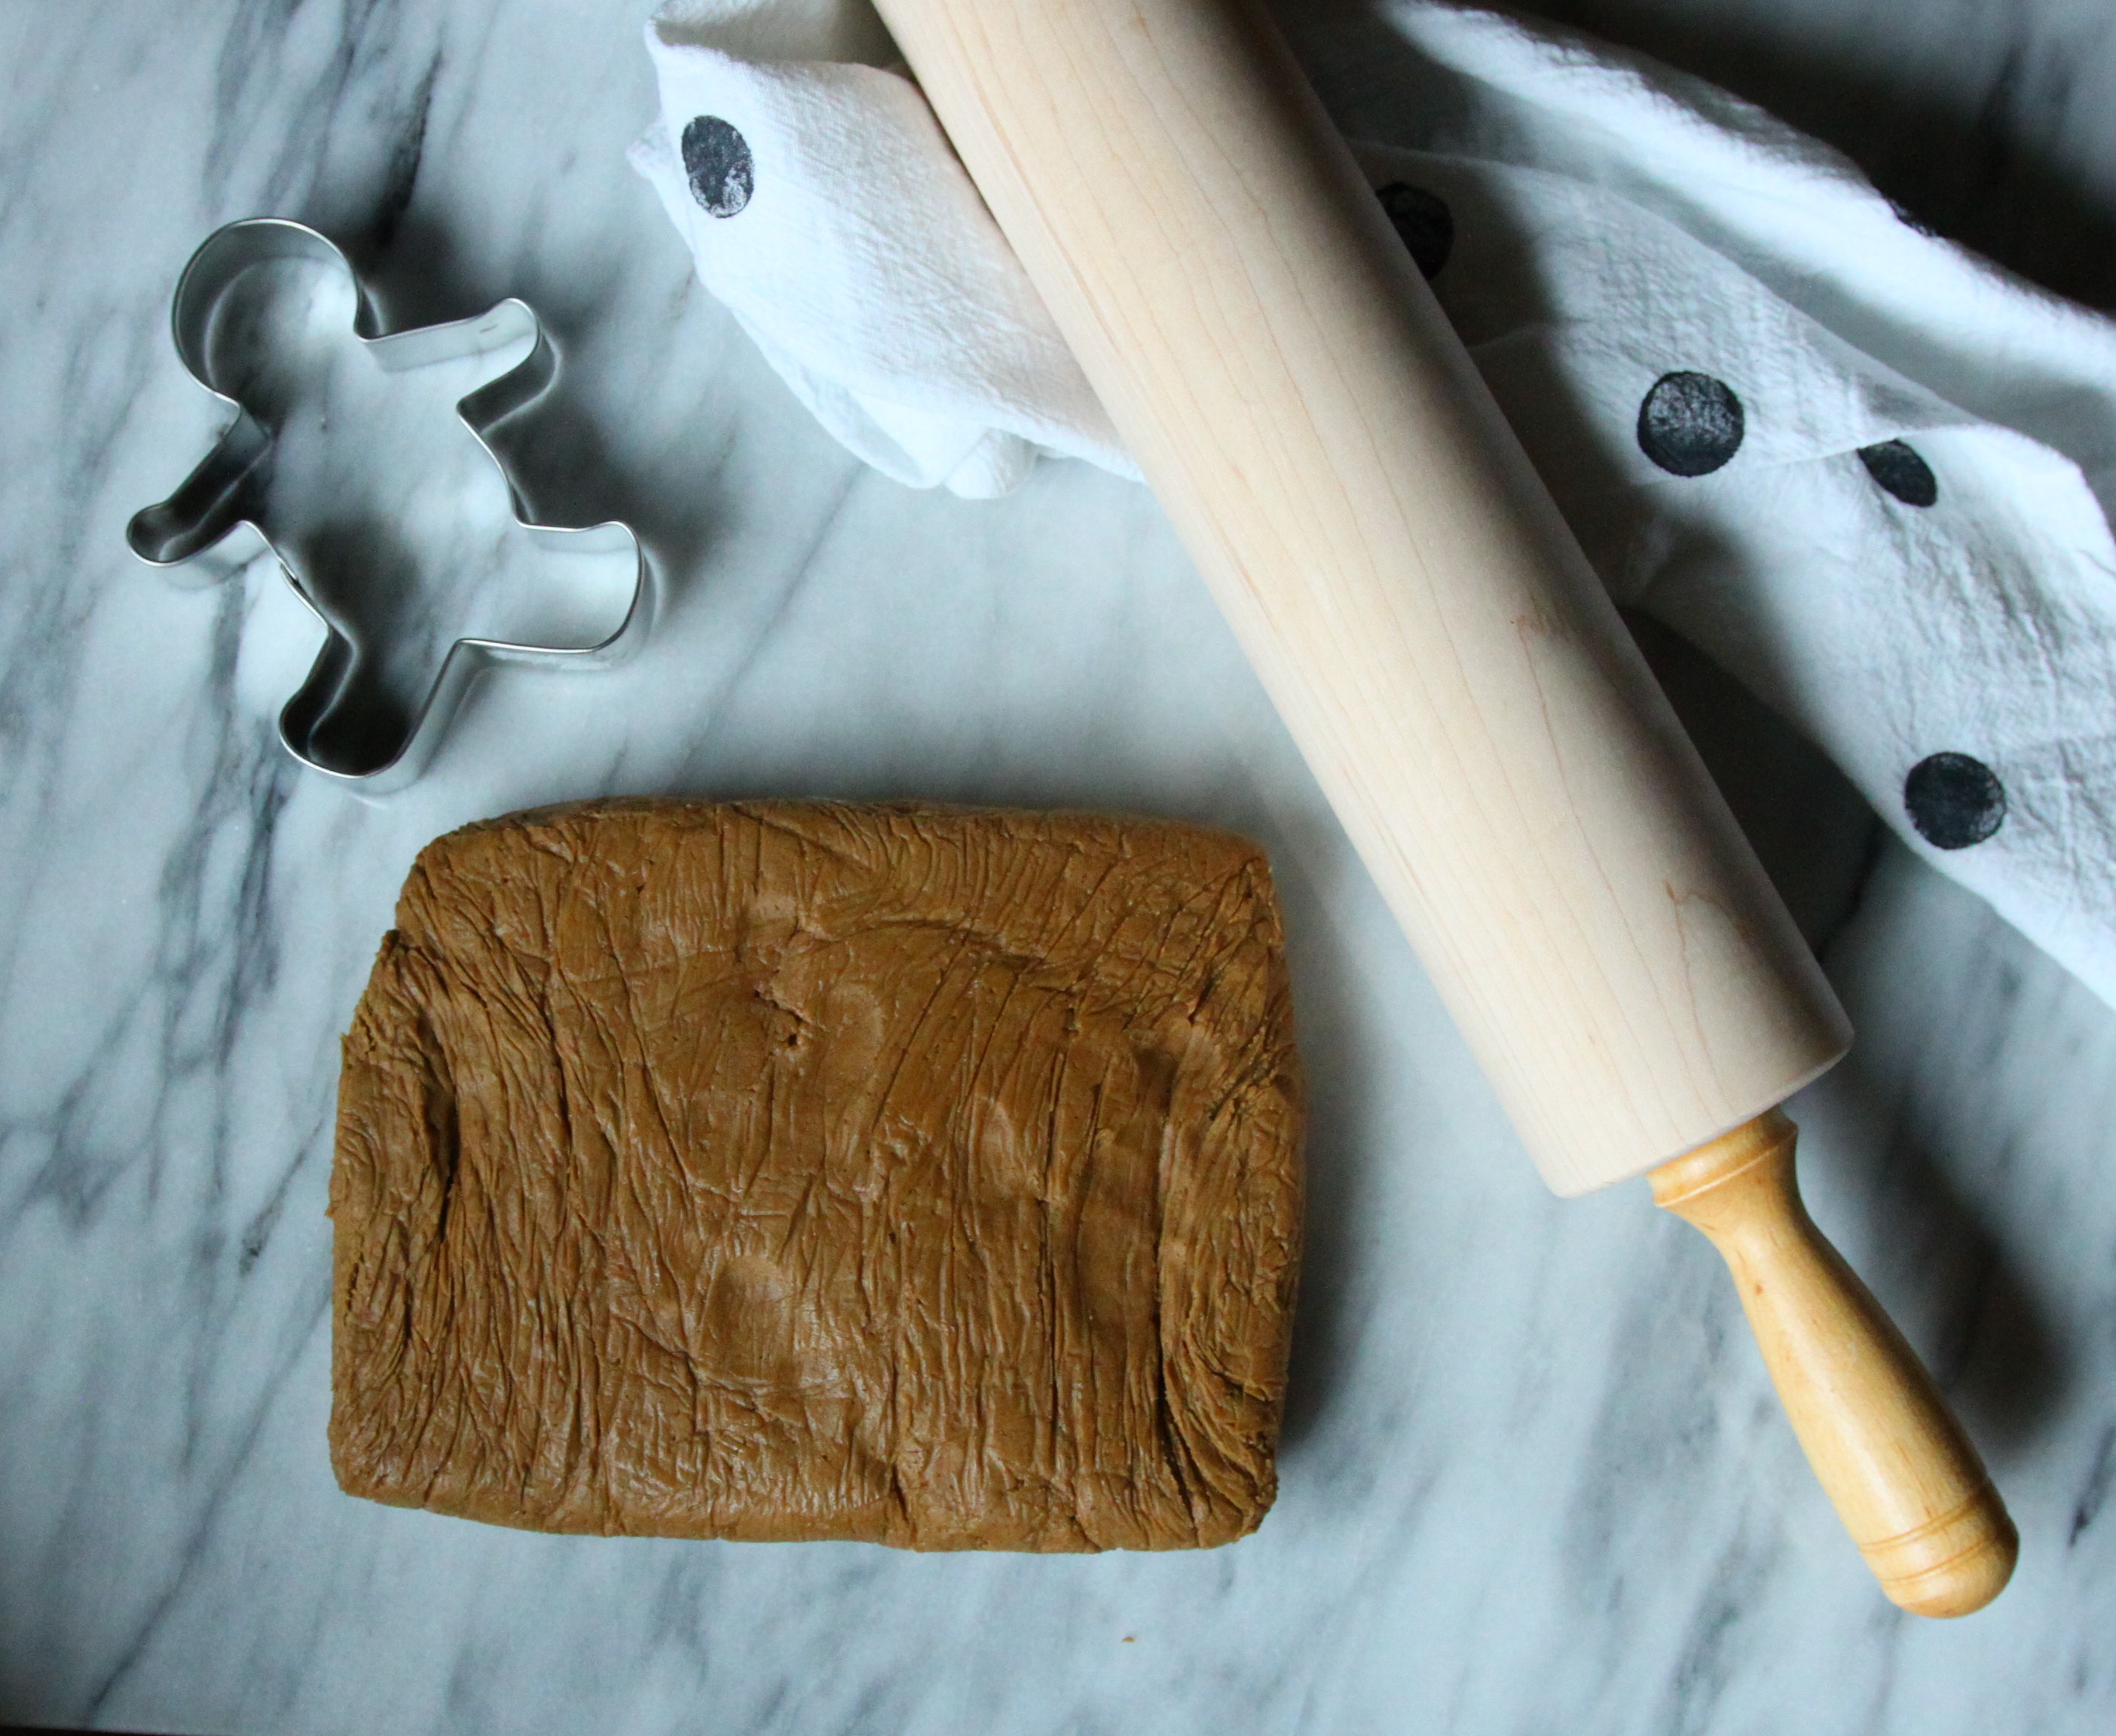
The key to making these cookies is to work fast. After mixing the dough, it’s important to wrap the dough in plastic then chill immediately. This will help the dough not only rest but get less sticky. Once it is chilled, it’s important to spread a good layer of flour on your work surface because it will stick. Also, move the dough clockwise in between each roll (while adding more flour if needed). This will help it to not stick.

FCGingerbread1


FCGingerbread2


FCGingerbread3


FCGingerbread4
Print Recipe
Gingerbread Cookies
There's nothing like the taste of fresh and spicy gingerbread men (and women) during the holiday season.
Prep Time 15 minutes
Cook Time 10 minutes
Passive Time 1 hour
Servings
Ingredients
Prep Time 15 minutes
Cook Time 10 minutes
Passive Time 1 hour
Servings
Ingredients
Instructions
  1. In a small bowl, whisk together flour, baking powder, baking soda, salt, and spices until well blended.
  2. In a large bowl beat butter, brown sugar, and egg on medium speed until well blended. Add molasses and vanilla, continue to mix until well blended. Gradually stir in dry ingredients until blended and smooth. Wrap dough in plastic and refrigerate for 1 hour.
  3. Preheat oven to 375 degrees, Prepare baking sheets by lining with parchment paper or silpat.
  4. Place the dough on a lightly floured surface. Sprinkle flour over dough and rolling pin. Roll dough to a scant 1/4-inch thick. Use additional flour to avoid sticking.
  5. Cut out cookies with gingerbread man shape. Place cookies about 1 1/2-inches apart on baking sheet. (I put the sheet pan with the cookies on it in the freezer for 10 minutes to solidify the butter. Though you’re welcome to skip this step.) With a pastry brush, wipe off excess flour on cookies then add a thin layer of egg wash (lightly beaten egg). Decorate cookies with sprinkles while lightly pushing them into place.
  6. Bake 1 sheet at a time for 7-10 minutes (7 minutes leads to softer cookies). Let cool on pan and enjoy! The can be frozen in a freezer bag for up to 3 weeks.


My Kitchen Re-do

I know this post is off topic for my blog but I wanted to share where the magic happens. Besides, who doesn’t like to see a good before and after? My weakness is watching the home makeover shows on HGTV so I’ll assume you love them too!

My husband and I recently moved into our first home together. The kitchen was great and had been previously redone over 15 years ago but we wanted to give it a breathe of new life. I also wanted to make it really functional for the amount of cooking and entertaining would like to do.

We had many ideas but some things were up in the air. Have you heard of the saying “you never know what’s behind the walls?” Well, this is such a true statement. We didn’t do a complete kitchen renovation because we were trying to keep the cost at a minimum. The HGTV shows are ridiculous in the sense that time and money are completely skewed. It’s never a couple thousand and it’s never a weekend. With that being said, our contractor was amazing and completed the project in 26 days.

We kept all of the cabinetry except for 2 walls and the walkway to make the island. Next, a lot of paint, subway tiled backsplash & poles, new countertops, sink, faucet, handles, air vent and lights did the trick!

*I know the window isn’t painted…. Lot’s of credit to my husband who wanted to get rid of the bar sink and put tiles on the poles, he really has the designer eye.

I’m incredibly happy and couldn’t ask for better!

Before

TheFoodieChefKitchen1

After

TheFoodieChefKitchen5

Before

TheFoodieChefKitchen3

After

TheFoodieChefKitchen4

Before

TheFoodieChefKitchen11

After

TheFoodieChefKitchen10

Sriracha Caramel Brussel Sprouts

Brussel Sprouts Fish Caramel 5

There’s a restaurant in Houston and Austin (Texas) called Uchi and they make the best brussel sprouts I have ever had. Back when these babies were all the rage, yes, I’m a little late, many restaurants tried to duplicate this recipe. Some were successful and some put a slight spin on them. Those of you who haven’t tried this dish, now is your chance. The best way I can describe it is crunchy, soft, salty, sweet and spicy. There’s really a lot going on.

I found a few recipes but then adapted it to suite my taste buds. Most of the recipes used a deep fryer, which makes the outside nice and crispy but the inside tender. The best way to achieve this is baking at a high temperate and making sure the sprouts are even in size. My recipe is NOT fried and healthier than their version! Though there is sugar, 3 tablespoons to be exact. But a little sugar doesn’t hurt anyone. 🙂

This Sriracha Caramel Fish Sauce Brussel Sprout recipe is the perfect addition to your holiday table. Your friends and family will love you, I promise. You can find the recipe here on Monica’s blog, Classy & Fabulous.

Brussel Sprouts Fish Caramel 4
Print Recipe
Sriracha Caramel Brussel Sprouts
Sriracha Caramel Brussel Sprouts also found on www.classandfab.com.
Prep Time 10 minutes
Cook Time 20 minutes
Servings
Ingredients
Prep Time 10 minutes
Cook Time 20 minutes
Servings
Ingredients
Instructions
  1. Preheat oven to 425. While the oven is heating, wash and trim brussel sprout ends. If the sprouts are really large, cut them in half.
  2. Prepare a baking sheet lined with foil. Spray generously with non-stick cooking spray. Toss sprouts with oil and bake for 15-20 minutes or until crispy.
  3. While the sprouts are cooking, place the sugar in a saucepan. Cook stirring with a high heat spatula until amber. Slowly pour in lemon juice, fish sauce, sriracha, garlic, and ½ c hot water. The sugar syrup may clump but keep cooking it until it melts and reduces. Add black pepper, remove from heat and set aside.
  4. Put sprouts in a serving dish and generously pour the sauce over them. Serve immediately.

Spooky Ghost Meringue Cookies 3 Ways

GhostMeringue1

Boo! Halloween is one of my favorite holidays. I love dressing up, going to costume parties and of course, making spooky treats! This year, I wanted to make something low fat and simple that anyone can do. I thought cute ghost meringue cookies 3 ways would be perfect.

I recall making meringue cookies in pastry school 5 years ago and they came out perfectly. A few years back, I was making some meringue mushrooms for a yule log. After spending time whipping the meringue, piping and anxiously waiting, they cracked and looked completely ugly. Since then, I’ve learned to never bake meringue in a deck oven. You might think, obviously, you would never cook meringue in a deck oven because they are meant bake bread or pizza in high heat. It’s also possible that the oven wasn’t calibrated and it overheated. I have to blame the oven, right? Of course it wasn’t me 😛

This time, I bought a nice little oven thermometer so I am sure that the temperature is accurate. My best advice is to know your oven- they’re all different. This little gadget is perfect to find out the truth in your oven. My next tip is to be extremely patient. If you haven’t noticed in cooking/ baking, patience is key. I remember working at a local restaurant and I was standing over a sauce pan filled with water staring down anxiously waiting for the water to boil. The chef stood over me and told me to stop staring, work on something else and have patience. Sure enough, after a few minutes, the water started to boil. From then on, I take heed in his advice.
GhostMeringue02

My last tip is that it’s all about the piping pressure. This takes practice and I suggest you test this out with store bought icing. This way, you can hone your practice while spending a small amount. First off, I really like to use disposable piping bags. I dislike the kind you wash because you have to spend time cleaning it. Most of the time it doesn’t even get cleaned thoroughly.

GhostMeringue3

For the ghosts, I fitted the piping bag with an 807 piping tip. This is to ensure the smoothness of the end product. Once your bag is read to go, fill it halfway with the meringue. With one hand, hold the tip about 1/4″ above the parchment paper. Start squeezing while slowly bringing your hand up and letting go of the pressure so that it tapers off leaving a little whisp. Like I said, it takes practice. You can play with the amount of pressure, when to raise the bag up and when to stop. You can see this in different ghosts, some are more round and some are skinnier.

In the end you get cute spooky ghosts that not only taste delicious but are low fat!

HalloweenMeringue4
Print Recipe
Spooky Ghost Meringue Cookies 3 Ways
Cute spooky ghosts that not only taste delicious but are low fat!
Prep Time 10 minutes
Cook Time 30 minutes
Passive Time 7 hours
Servings
Prep Time 10 minutes
Cook Time 30 minutes
Passive Time 7 hours
Servings
Instructions
  1. Preheat oven to 260 degrees.
  2. Combine egg whites, salt, cream of tartar, and vanilla in a standing mixer fitted with a whisk attachment. Whip on medium high for about 3 minutes until soft peaks are achieved. Slowly add sugar while the whisk is whipping and switch to high for about 2 minutes until stiff peaks are formed. It should be smooth and not gritty.
  3. Prepare 2 cookie sheets with parchment paper. Put a tiny dollop of the meringue in each corner fastening the parchment paper to the sheet. Fill a pastry bag halfway fitted with an 807 tip. With patience and ease, pipe little ghosts filling each sheet. Refer to above notes on details of piping.
  4. Once all of the ghosts are piped, carefully drop black nonpariels in place of eyes. You can also use mini chocolate chips or even cover them with orange and black sprinkles.
  5. Bake for 25-30 mintues and then turn off the oven and let them sit overnight (or several hours). Store them in an airtight container and they'll last for several days.
Recipe Notes

My best advice is to know your oven- they're all different.

My next tip is to be extremely patient.

My last tip is that it's all about the piping pressure.  I really like to use disposable piping bags.


Mozzarella Chicken with Blistered Tomatoes

I really enjoy a good food challenge. I was asked to create a dish for a family of 4 for under $10. The only way I could do this was by shopping at ALDI. They have very affordable produce that allowed me to conquer this challenge. They also don’t provide shopping bags which is perfect because phew I always bring my own when I shop 🙂
This recipe is my take on caprese chicken though if the challenge allowed for a few more dollars, I would have added a basil balsamic drizzle. I like making chicken thighs every once in a while since it has a higher fat content compared to chicken breast. The fat content allows for juicy meat though you can still achieve this with chicken breast when marinating or brining.
The combo of juicy meat, salty smooth mozzarella and tangy sweet tomatoes is the perfect mix. The spinach is the best green addition. I always try to add a green veggie to all of my meals for my customers and myself. I hope your family loves this dish as much as mine does!
TheFoodieChef Mozzarella Chicken2
TheFoodieChef Mozzarella Chicken3
TheFoodieChef Mozzarella Chicken4
TheFoodieChef Mozzarella Chicken5
 
Print Recipe
Mozzarella Chicken with Blistered Tomatoes with Garlic Spinach
The combo of juicy meat, salty smooth mozzarella and tangy sweet tomatoes is the perfect mix.
Prep Time 10 minutes
Cook Time 40 minutes
Servings
4 people
Prep Time 10 minutes
Cook Time 40 minutes
Servings
4 people
Instructions
  1. Preheat oven to 350. Empty washed cherry tomatoes onto a foil lined sheet pan.
  2. Toss with 2T oil, salt and pepper. Bake for 15 minutes or until blistered.
  3. Place chicken thighs onto foil lined baking sheet, toss with oil, salt, pepper, and garlic powder. Bake 15-20 or until instant thermometer reads 165.
  4. Thaw spinach according to packaging. Squeeze out remaining water and transfer to a skillet with 1T oil. Add salt, pepper, and garlic powder to taste. Squeeze half of a lemon on top, set aside.
  5. Slice thin pieces of mozzarella. Place 1 piece on each chicken thigh. Bake for 4 minutes or until cheese is melted.
  6. Arrange a bed of spinach on a platter then add the chicken cascading onto the next piece. Then sprinkle the blistered tomatoes on top. Viola! You have dinner for 4 under $10!

Apple Honey Cake

IMG_2976

Fall has arrived and I’ve neglected my blog :(. Though I do post often on instagram so you can catch me there. The summer was pretty busy and I got to visit really great places and I’ll share that in another post.

In Houston, one day it’s 100 degrees and humid and the next it’s 84 with clear skies, hello fall! Unfortunately, it doesn’t last long but we do get to take advantage of comforting recipes. Especially for Rosh Hashana where we celebrate a sweet new year with apples and honey. This apple and honey cake is the perfect, almost coffee cake like end to a filling meal.

My mom distributed recipes to most guests to help her prepare for this meal. I got the apple honey cake though I assume it’s because I’m the only one who went to pastry school and I enjoy a good challenge. It’s surprisingly easy to make and it looks gorgeous once you’ve cascaded the apples around the raw dough.

To me, quality ingredients are key. I opted for organic honeycrisp apples and they held their crispness and didn’t get soggy- the best baking apple. I will definitely make this recipe again but I may add a bit more ginger or even cardamom for a kick.

Print Recipe
Apple Honey Cake
adapted from The New York Times recipe
Servings
Ingredients
For the Cake
For the Glaze
Servings
Ingredients
For the Cake
For the Glaze
Instructions
Make the Cake
  1. Heat oven to 325 degrees and position a rack in the middle of the oven. Butter and flour a 9-inch cake pan, preferably a springform pan.
  2. With an electric mixer, cream the butter and sugar, then add honey and whip for 1 minute, until fluffy. Beat in eggs one at a time, until well incorporated, then whip for 2 minutes. Stir in grated ginger, candied ginger, and lemon zest.
  3. Whisk together flour, cinnamon, salt and baking powder and add to bowl, mixing briefly to make a stiff batter. Pour batter into prepared pan.
  4. With a paring knife, cut slits in each of the apple quarters on the rounded, outer part of the wedge, slicing partway through at 1/8-inch intervals. Arrange apple quarters slit-side-up over the batter. Sprinkle surface with 1 tablespoon sugar.
  5. Place cake pan on a baking sheet and put on middle rack of oven. Bake for about 45 minutes, or until an inserted skewer emerges dry. (It took about 52 minutes for me) If cake is browning too rapidly, tent with foil until done. Cool on a rack, then carefully unmold.
Make the Glaze
  1. Put sugar, honey and lemon juice in a small saucepan over medium heat, stirring until sugar is dissolved and mixture bubbles, about 2 minutes. Paint surface of cake and apples with warm glaze. Cake will keep for several days, tightly wrapped, at room temperature.


Sour Cherry Deep Dish Pie

cherry pie 3

It has been years since I’ve made a homemade pie, maybe since pastry school. These days all of my effort is put into savory food and it’s a treat (pun intended 😉 ) to make a dessert every so often. Fresh cherries are in season and this is what I’m bringing to a friend’s July 4th party.

I took a little bit of a shortcut and bought pie dough. Now, I’m all about homemade food but sometimes it’s ok to make an exception when you’re in a pinch. I didn’t have pie weights so I used a nine inch cake pan to help weigh the dough down while cooking. There’s nothing worse than hard dough bubble that cannot be popped only to ruin your entire pie. When I pulled the pan out of the springform pan, I noticed some cracks in the dough. I quickly remembered that my reserved small piece of raw dough could be filled in, *thank you pastry school.

cherries 1
pitting cherriescherries 2

cherries 3

dough

cherry pie 2 cherry pie 4
Print Recipe
Sour Cherry Deep Dish Pie
Prep Time 15 minutes
Cook Time 50 minutes
Passive Time 1 hour
Servings
6 people
Ingredients
Egg wash
Prep Time 15 minutes
Cook Time 50 minutes
Passive Time 1 hour
Servings
6 people
Ingredients
Egg wash
Instructions
  1. For the egg wash : whisk together egg and salt.
  2. Preheat oven to 350.
  3. Place the pitted cherries in a bowl. Stir in the vanilla. In a small bowl, whisk together the sugar and cornstarch, and sprinkle the mixture over the cherries.
  4. Toss the sugar and cornstarch mixture with the cherries until they are evenly coated then set aside
  5. Roll the dough out so that it fits in a 9” spring form pan. Reserve the second pie dough for the lattice top. Work fast as the dough is hard to work with when it warms up. If the dough doesn’t fit perfectly, you can piece it together by pressing the edges to meet. Make sure there aren’t any thin spots since the dough is very delicate. Once it’s in the pan, prick all around with a fork. This helps the steam exit causing fewer bubbles. I placed an 8” cake pan inside to weigh it down but if you have pie weights, please use them! Cook for about 5-7 minutes until cooked.
  6. Pour the cherry mixture into the cooked crust. Cover the top of the pie with the chilled, rolled top crust, or cut into strips and make a lattice crust over the top. Crimp the edges and chill for 20 minutes.
  7. Preheat the oven to 425° F. After pie has chilled, brush the top with egg wash and sprinkle with sugar (optional). Place in preheated oven and bake for 20 minutes at 425°. Reduce the heat to 350° and continue to bake for another 20-25 minutes, or until the crust is golden brown and the filling is bubbling. Allow to cool for at least 1 hour before serving.
  8. *This recipe is more on the crumble side to please serve with ice cream 🙂
Recipe Notes

Hint – I had a few cracks in my dough so I filled them in with raw dough, works like a charm 🙂

Summer Salad

Summer Salad 1

Everyone needs a go-to refreshing summer salad recipe when it gets hot out. This is mine that’s sure to wow a crowd. It’s sweet and slightly bitter which compliments any dish that comes as the main course.

When I was coming up with recipe I was trying to find a veggie that pops. I really wanted a watermelon radish but they were no where to be found in my city :(. I seriously looked everywhere and tried to special order them, it was a no go. I stumbled upon these gorgeous chioggia beets, luckily! They really make the salad with their tie-dye pretty look.

Normally, I make salads with arugula, romaine or spinach but sunflower sprouts bring something different to the table. Not only is their texture slightly crunchy but it delivers a lemony nutty flavor. This is a perfect compliment to the sweet, sour and bitter flavors from the cherries, orange and beets. The best part is that this recipe is versatile for all diets: vegan, vegetarian, carnivores, gluten free, kosher and the list goes on.

Beets


Summer Salad 2


Summer Salad 2


Summer Salad 2
Print Recipe
Summer Salad
Servings
Ingredients
Salad Ingredients
Dressing Ingredients
Servings
Ingredients
Salad Ingredients
Dressing Ingredients
Instructions
  1. Combine all dressing ingredients in blender. Blend and set aside.
  2. Toss sunflower sprouts in the dressing then pile them on the plate. After, add the sectioned orange, cherries, beets and optional items. Serve immediately

Truffled Asparagus Tart

Asparagus Tart 1:The Foodie ChefI’ve been wanting to make this beautifully simple gruyere asparagus tart recipe for a while now. Houston Tidbits asked to do collaboration with me and Whole Foods and I just couldn’t pass it up. This was the perfect time to tweak this recipe to be even better than it is. If you’re looking for a perfectly pretty appetizer or a nice partner to a green salad, this recipe is the way to go! I used the best organic ingredients from Whole Foods’ 365 organic brand. It’s quality stuff and I just love their products.

I opted to purchase the puff pastry since it’s such a time consuming item to make. I remember making it in pastry school using a sheeter, which makes it so easy. The machine simply thins the dough out to your liking. I remember one time my group and I decided to make it by hand without the sheeter. (bad idea) We had to quickly roll out butter into thin sheets while folding it like a book into the dough, then repeating this process several times. You can really get some great arm muscles from this process. Get my drift? Trust me, just buy frozen puff pastry, it’s a great ready-made product.

The secret ingredient, truffle oil, was a generous gift from a sweet friend who visited France recently. It adds the perfect woodsy component to the rich buttery pastry and salty yet sweet Gruyere and asparagus. It’s a serious umami thing going on, you must try it.Asparagus Tart 6:The Foodie Chef

Asparagus Tart 7:The Foodie Chef Asparagus Tart 8:The Foodie Chef Asparagus Tart 5:The Foodie Chef Asparagus Tart 4:The Foodie Chef Asparagus Tart 2:The Foodie Chef


Asparagus Tart 3:The Foodie Chef
Print Recipe
Truffled Asparagus Tart
Recipe adapted from Martha Stewart
Prep Time 10 minutes
Cook Time 35 minutes
Servings
Prep Time 10 minutes
Cook Time 35 minutes
Servings
Instructions
  1. Preheat oven to 400 degrees. On a floured surface, roll the puff pastry into a 16-by-10-inch rectangle. Trim uneven edges. Place pastry on a baking sheet lined with a silpat or parchment paper. With a sharp knife, lightly score pastry dough 1 inch in from the edges to mark a rectangle. Using a fork, pierce dough inside the markings at 1/2-inch intervals. Bake until golden, about 15 minutes.
  2. Remove pastry shell from oven, and sprinkle with Gruyere. Trim the bottoms of the asparagus spears to fit crosswise inside the tart shell; toss in olive oil then arrange in a single layer over Gruyere. Season with salt, pepper, and garlic powder. Bake until spears are tender, 20 to 25 minutes. After, lightly drizzle with good quality truffle oil.

Easy Tostadas

Tostadas

Happy Cinco de Mayo!! In honor of this fab holiday, I’m sharing one of my super quick go to meals. My tostadas are kind of like one big nacho.

This healthy recipe is easily Gluten Free, Kosher, Vegan and Vegetarian (I have no cheese on it but it can be added 🙂 ) Check out my super cool gif below. It’s my first time making one so don’t judge 😛

Tostada Gif
Print Recipe
Easy Tostadas
This healthy recipe is easily Gluten Free, Kosher, Vegan and Vegetarian.
Instructions
  1. Preheat oven to 350. Spray each side of the corn tortillas with cooking spray then sprinkle chili powder on them. Lay them flat on a sheet pan and bake for 7 minutes until hard. Once finished, spread in this order: black beans, black olives, guacamole, and pico. They're ready to eat!